How to Render Multitimbral Instruments in Cubase

How to Render Multitimbral Instruments in Cubase
I think you will agree with me when I tell you that rendering third-party virtual multitimbral instruments is way more complicated than it should be in Cubase, especially, when creating individual mono audio files. Instruments are considered multitimbral when they have more than just the one main stereo output.
At maximum VST instruments can have up to 16 stereo outputs or a combination of at least one stereo and up to 30 mono outputs depending on the instruments default settings.

How to Customize Native Instruments Battery Output Settings
Let's talk about Native Instruments Battery Engine Output Settings, for example, which when customizing default to a minimum of 4 stereo outputs when trying to activate mono outputs. This setting cannot be changed.
Set Preferences for NI Battery Audio Outputs

[ NI Battery preferences settings ]
Activate Outputs for NI Battery

[ NI Battery activate output settings ]
When rendering tracks using NI Battery, by default, they end up as stereo audio files even though the source might have been a mono audio sample or a stereo sample assigned to a mono output. This results in rendered stereo audio files which are twice the file size without improving the audio quality.
Browsing the internet I noticed a lot of people struggling with this everyday task. But I promise that I found a solution that I'm happy to share with you. In case you don't already know when you would want to render mono audio files, the next section will show you a detailed example of why you would use this in a typical computer-based music production.
Drum Programming Using a MIDI Sampler
Drums are usually coming from a sampler which is loaded with so-called "One-Shot Samples". Each sample usually consists of a recording of a single drum sound (kick, snare, hi-hat, etc) which can be triggered by either using a MIDI controller (MIDI keyboard, drum pad, etc) or by drawing the MIDI notes into the "Key Editor" or "Drum Editor" in Cubase. Typically you have to assign each drum sample to an individual output to be able to control each sound separately when mixing and processing.
Preparing Your MIDI Instrument Tracks for Mixing in Cubase
Before starting to mix it is a good idea to convert all your MIDI to audio first. But how do you do this using NI Battery in Cubase if you want to render all of your outputs as mono files?
How to Output Mono Using NI Battery in Cubase
-
In your virtual instrument (for example NI Battery) activate all necessary outputs if needed and assign each instrument sound to a separate output.
Assign Each Instrument Sound to an Individual Output

[ NI Battery Assigning each Sound to an Individual Output ]
Multiple ways to Activate Outputs on Virtual Instruments
The quickest way to enable multiple outputs at once is to choose "Activate Outputs" using either the "VSTi Tab" in your Project Window's "Right Zone", or doing the same thing opening the "Virtual Instruments Rack" by pressing F11. Both options will give you the same ability to activate multiple outputs all at once.
Activate Outputs of Virtual Instrument in the VSTi Tab

[ VSTi Tab Virtual Instrument Activate Outputs ]
Activate Multiple Outputs All at once

[ VSTi Tab Virtual Instrument Activate Multiple Outputs at once ]
Please Note: to keep perfectly organized make sure that you give each output matching names which allow you, later on, to know which sound is routed to which channel in your MixConsole. You can name the channel either in the "MixConsole" or using the "Track List" of your "Project Window".
-
Move the MIDI part over to a new MIDI track if you have it on an instrument track and assign the MIDI track to the Virtual Instrument. The reason for doing this extra step is to prevent Cubase from creating unnecessary additional copies of your instrument track when dissolving the MIDI part.
For example if you are using 6 different "One-Shot Drum Samples" routed to different outputs of your virtual instrument (for example in NI Battery), and you choose "MIDI" - "Dissolve Part" on the MIDI part located on the instrument track itself, you would end up with unnecessary additional copies of your instrument track.
It can get very challenging even for the most experienced engineer. This would create 6 duplications of your instrument, each with 6 output channels (kick, snare, hi-hat, etc) which results to 36 channels in your MixConsole.
Unnecessary Outputs of your Duplicated Instruments in MixConsole
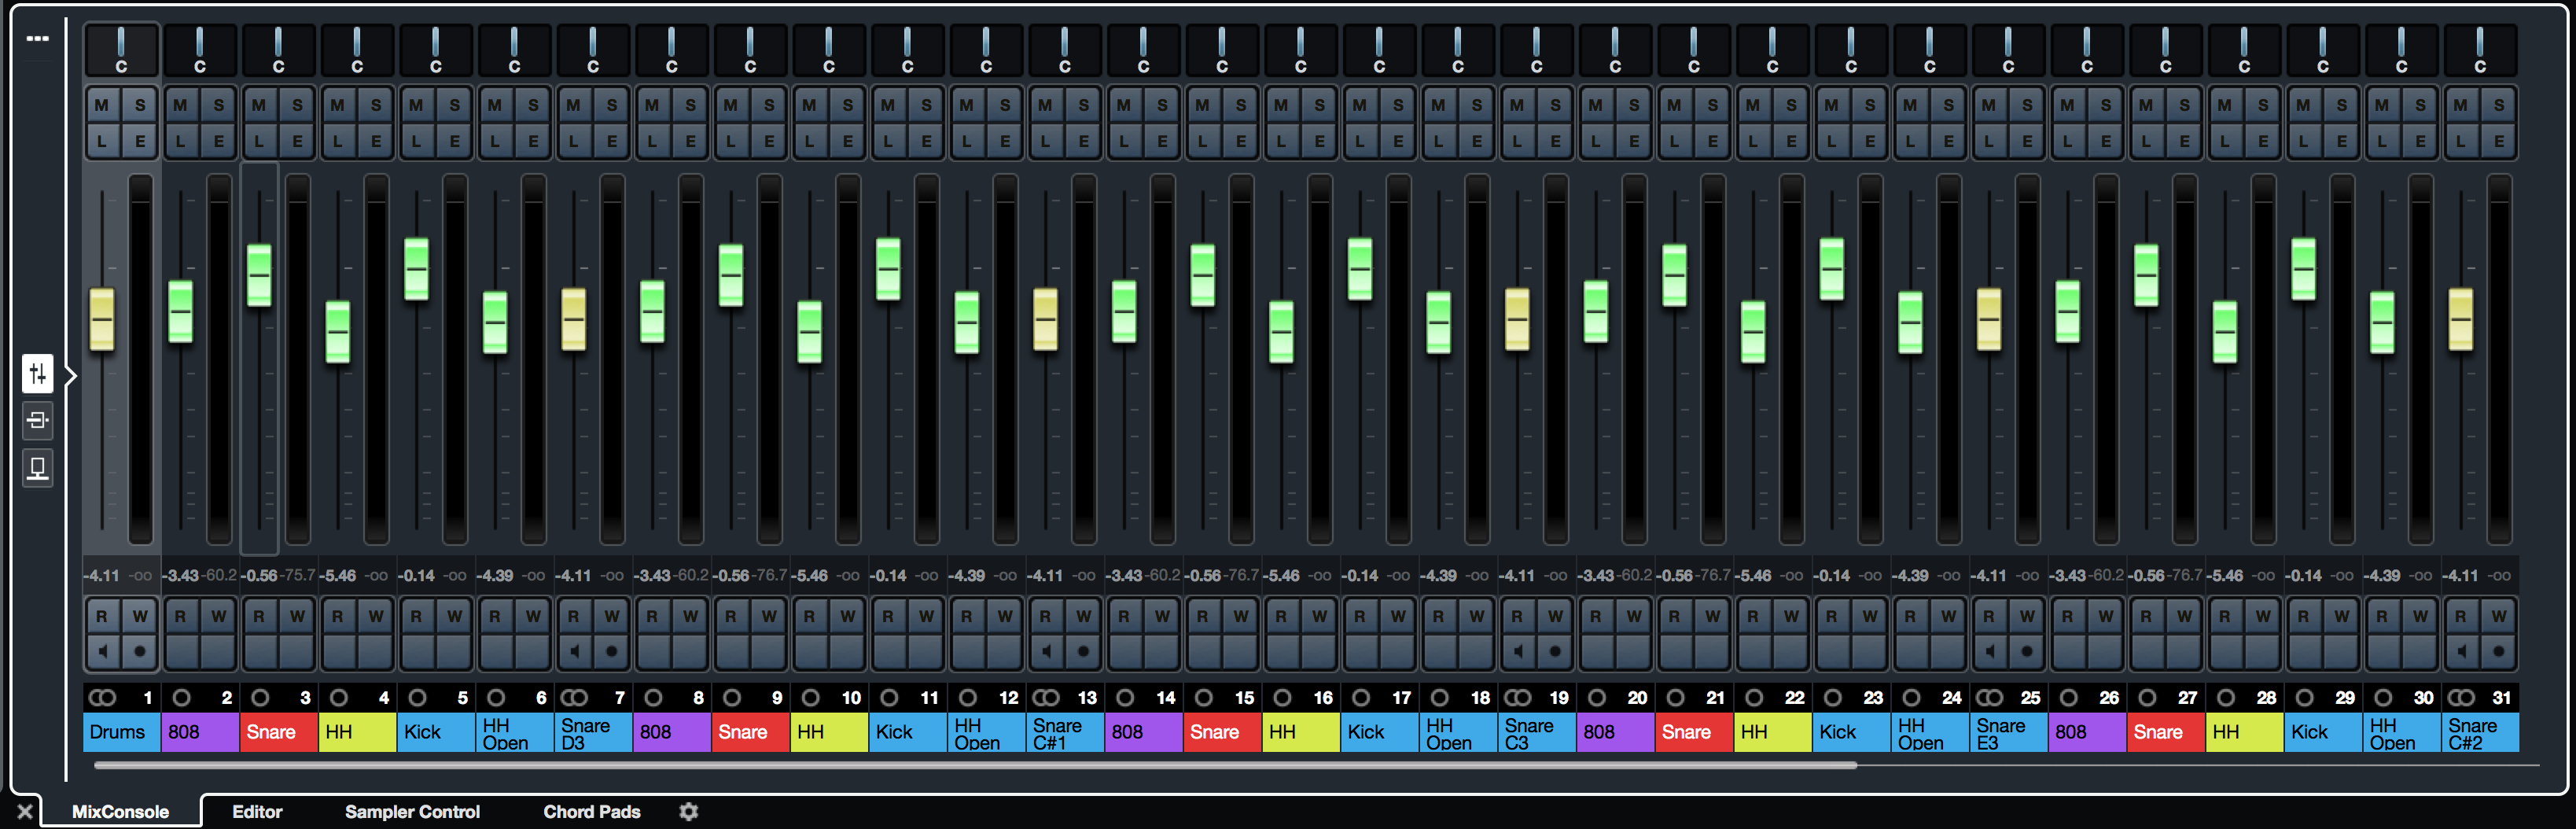
[ MixConsole with multiplied outputs for virtual instrument ]
Imagine having this happen with 20 outputs enabled: this would clone your virtual instrument 20 times and would create 400 output channels including all channel strip settings in your MixConsole. This will cause your CPU to max out.
Assign the MIDI track to the Virtual Instrument
Make sure to check that the MIDI track is assigned to the Virtual Instrument. You can easily do this in the Inspector Panel. If your MIDI track doesn't have the correct instrument assigned the next step won't work.
Assign Midi to Instrument Step 1

[ Inspector Panel Virtual Instrument Output Assignment - Step 1 ]
Assign Midi to Instrument Step 2
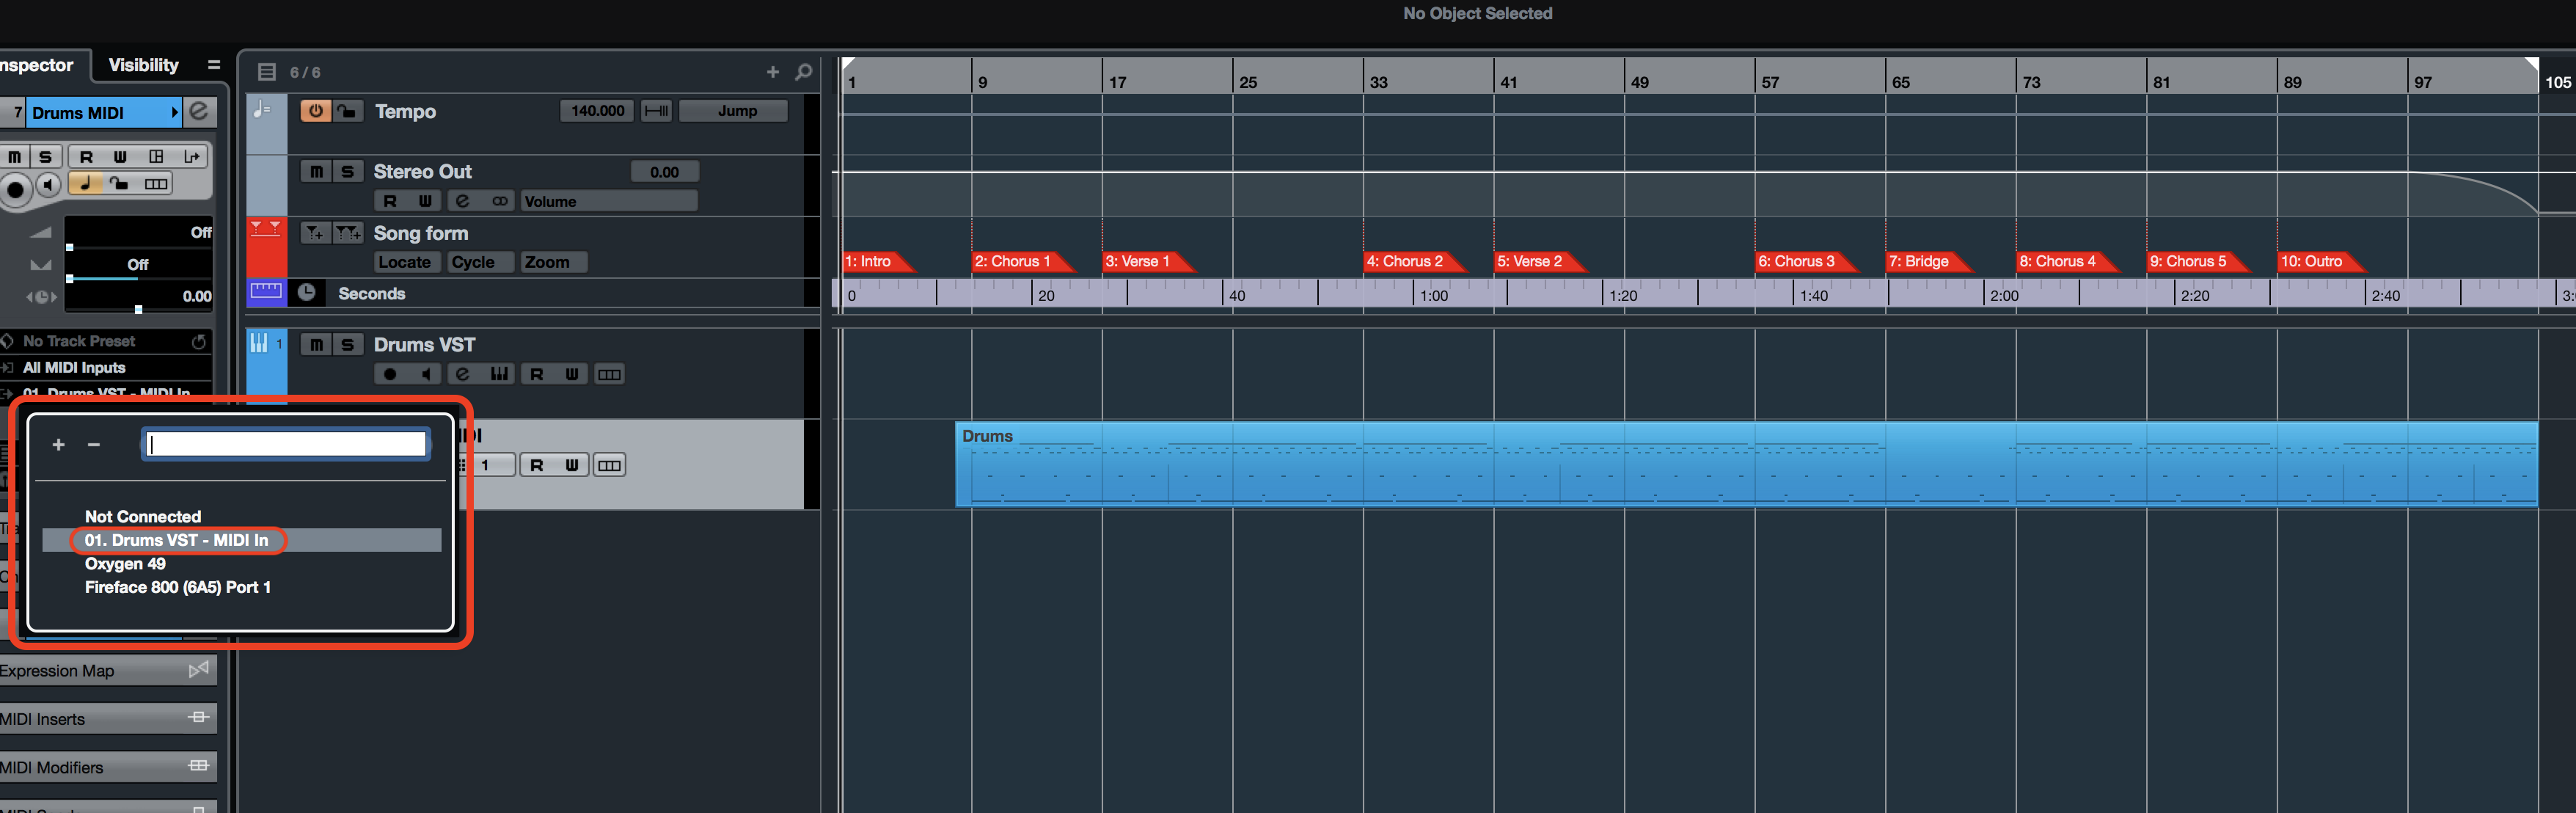
[ Inspector Panel Virtual Instrument Output Assignment - Step 2 ]
Please Note: before going to the next step make sure you first move the MIDI part over to a new MIDI track, check your instrument output assignments, and verify the MIDI channel settings. You can test this by playing back your song and making sure you hear all parts.
-
Next, separate the MIDI part by pitch by right-clicking on the MIDI part and choosing "MIDI" - "Dissolve Part". This feature will create a unique MIDI track for each pitch.
For melodic percussion, tuned 808s, or pitched samples I recommend for you to dissolve it manually instead of using the built-in Cubase feature.
How to Dissolve a MIDI Part Manually
Add a new MIDI track, then draw in an empty MIDI part as a placeholder on the project window.
Highlight all MIDI events of your melodic percussion in the Key Editor window using the select tool then cut them using "cmd + X" on Mac or "Ctrl + X" on PC.
Open the newly created blank MIDI part (Step 1) in the Key Editor and paste the events using "cmd + V" on Mac or "Ctrl + V" on PC.
After you are done dissolving the part it is important to rename the newly created MIDI tracks because they usually only consist of the original MIDI part name and the pitch which might make them hard to identify (For example Drums C1, Drums A2, etc). If you rename the MIDI track and hold down Shift before pressing Enter then Cubase will also rename all MIDI events on that track even if it consists of multiple parts. This is particularly important because the actual rendered audio files will inherit the same name as the MIDI parts.
-
Make sure the MIDI routing is set up correctly: the dissolved part creates new individual MIDI tracks. In older versions of Cubase, those tracks were automatically assigned to ascending MIDI channel values (1 - 16). This has been changed with the latest Cubase Update 9.5.30 for both Windows and Mac. Before this enhancement, the default feature caused drums to not trigger any playback since the MIDI channel assignment was not routed appropriately. In order to fix this, you had to change the MIDI channel values manually to match the MIDI channel value you chose for your Virtual Instrument.
For example: if you chose MIDI channel 10 for you drum sampler, you then had to match all the channel values in your MIDI tracks to point to MIDI channel 10. You can do this easily by highlighting all MIDI tracks in the Track List, then choose your MIDI channel on one of them, and hold down "Shift + option" on Mac or "Shift + Alt" on PC to temporarily link them together which changes all MIDI channel values for all selected tracks simultaneously.
-
Add a Mono Output Bus in your Audio Connections: open the "Audio Connections" using F4, then open the "Outputs" tab, right click on the empty space and under "Add Bus" select "Mono" but make sure you don't connect this bus to any physical output of your audio interface. It is supposed to show "Not Connected" in the Device Port column. This is needed to enable exporting your MIDI parts to mono audio files in Cubase. If you don't name the bus the Output Bus will automatically be named "Mono Out".
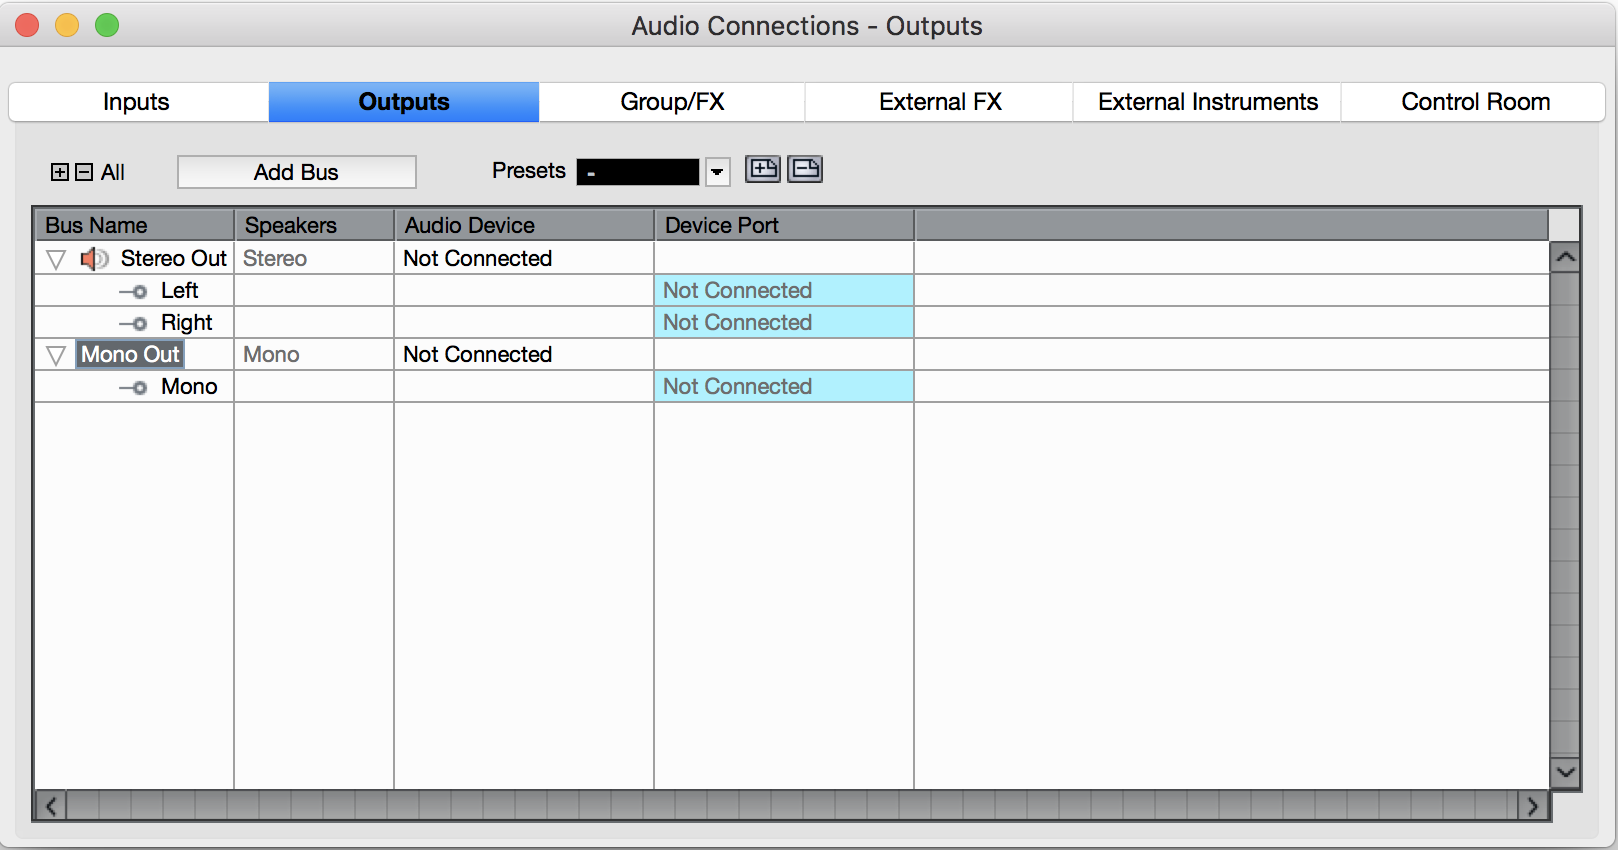
[ Create Mono Output Bus in Audio Connections ]
-
Assign Outputs to Mono Output Bus: open the Mixer using F3 and select all your virtual instrument outputs. Hold down "Shift + option" on Mac or "Shift + Alt" on PC and click one of the routing drop-downs of one of the selected channels on top of your MixConsole.
Change the Output Routing from the default "Stereo Out" bus to the "Mono Out" output bus we previously created in step 5. I would also recommend for you to unassign the Main Stereo output of your multitimbral virtual instrument in your MixConsole or to route it to the "Mono Out" output bus even if you are not using it.
Select Output Routing

[ Select Output Routing ]
Assigning the Mono Bus

[ Assigning the Mono Bus ]
If you leave the Virtual Instrument's Main Stereo output assigned to the "Stereo Out" bus, Cubase is going to create an extra stereo track for each sound which won't capture any audio in it. Use this to prevent Cubase from creating and adding unnecessary empty audio files.
-
Now you're ready to render your MIDI parts to mono audio: In the "Project Window" select all your dissolved MIDI parts and right click on one of them and choose "Render in Place" - "Render Settings". Make sure you select "Complete Signal Path" otherwise you won't get any audio in the rendered files. Here I would recommend selecting "As One Event" to make sure you get continuous files from start to finish. Alternatively, you can choose "As Separate Events" which would ensure that each MIDI part on each MIDI track gets rendered into a separate file. Choosing the latter option will make it nearly impossible for collaborators that are using another DAW to play back your files at the correct location of the song because the position of the audio events does not get saved.
Important: if you don't want to include your effects and channel settings you have to disable them manually before rendering the MIDI parts. You can't use the "Dry Transfer Channel Settings" option for this task since it won't output any audio in the rendered file because it only exports the instrument's Main Stereo output which we aren't using in this example.
Render in Place - Render Settings

[ Render in Place - Render Settings ]
Render Settings Selection
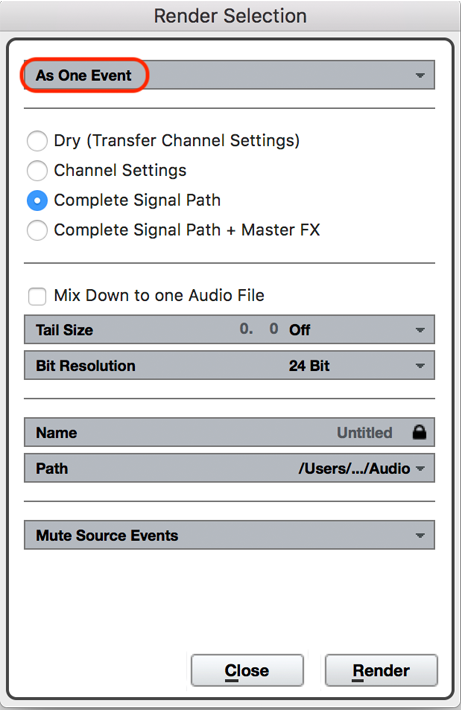
[ Render Settings Selection ]
-
By default, each rendered MIDI track appears on its own audio track. Since we chose to render the "Complete Signal Path" each of these audio tracks will be named after the output bus which by default is called "Mono Bus". This results in audio tracks that are all named "Mono Bus (R)" with ascending numbers trailing the track name when rendering multiple MIDI tracks.
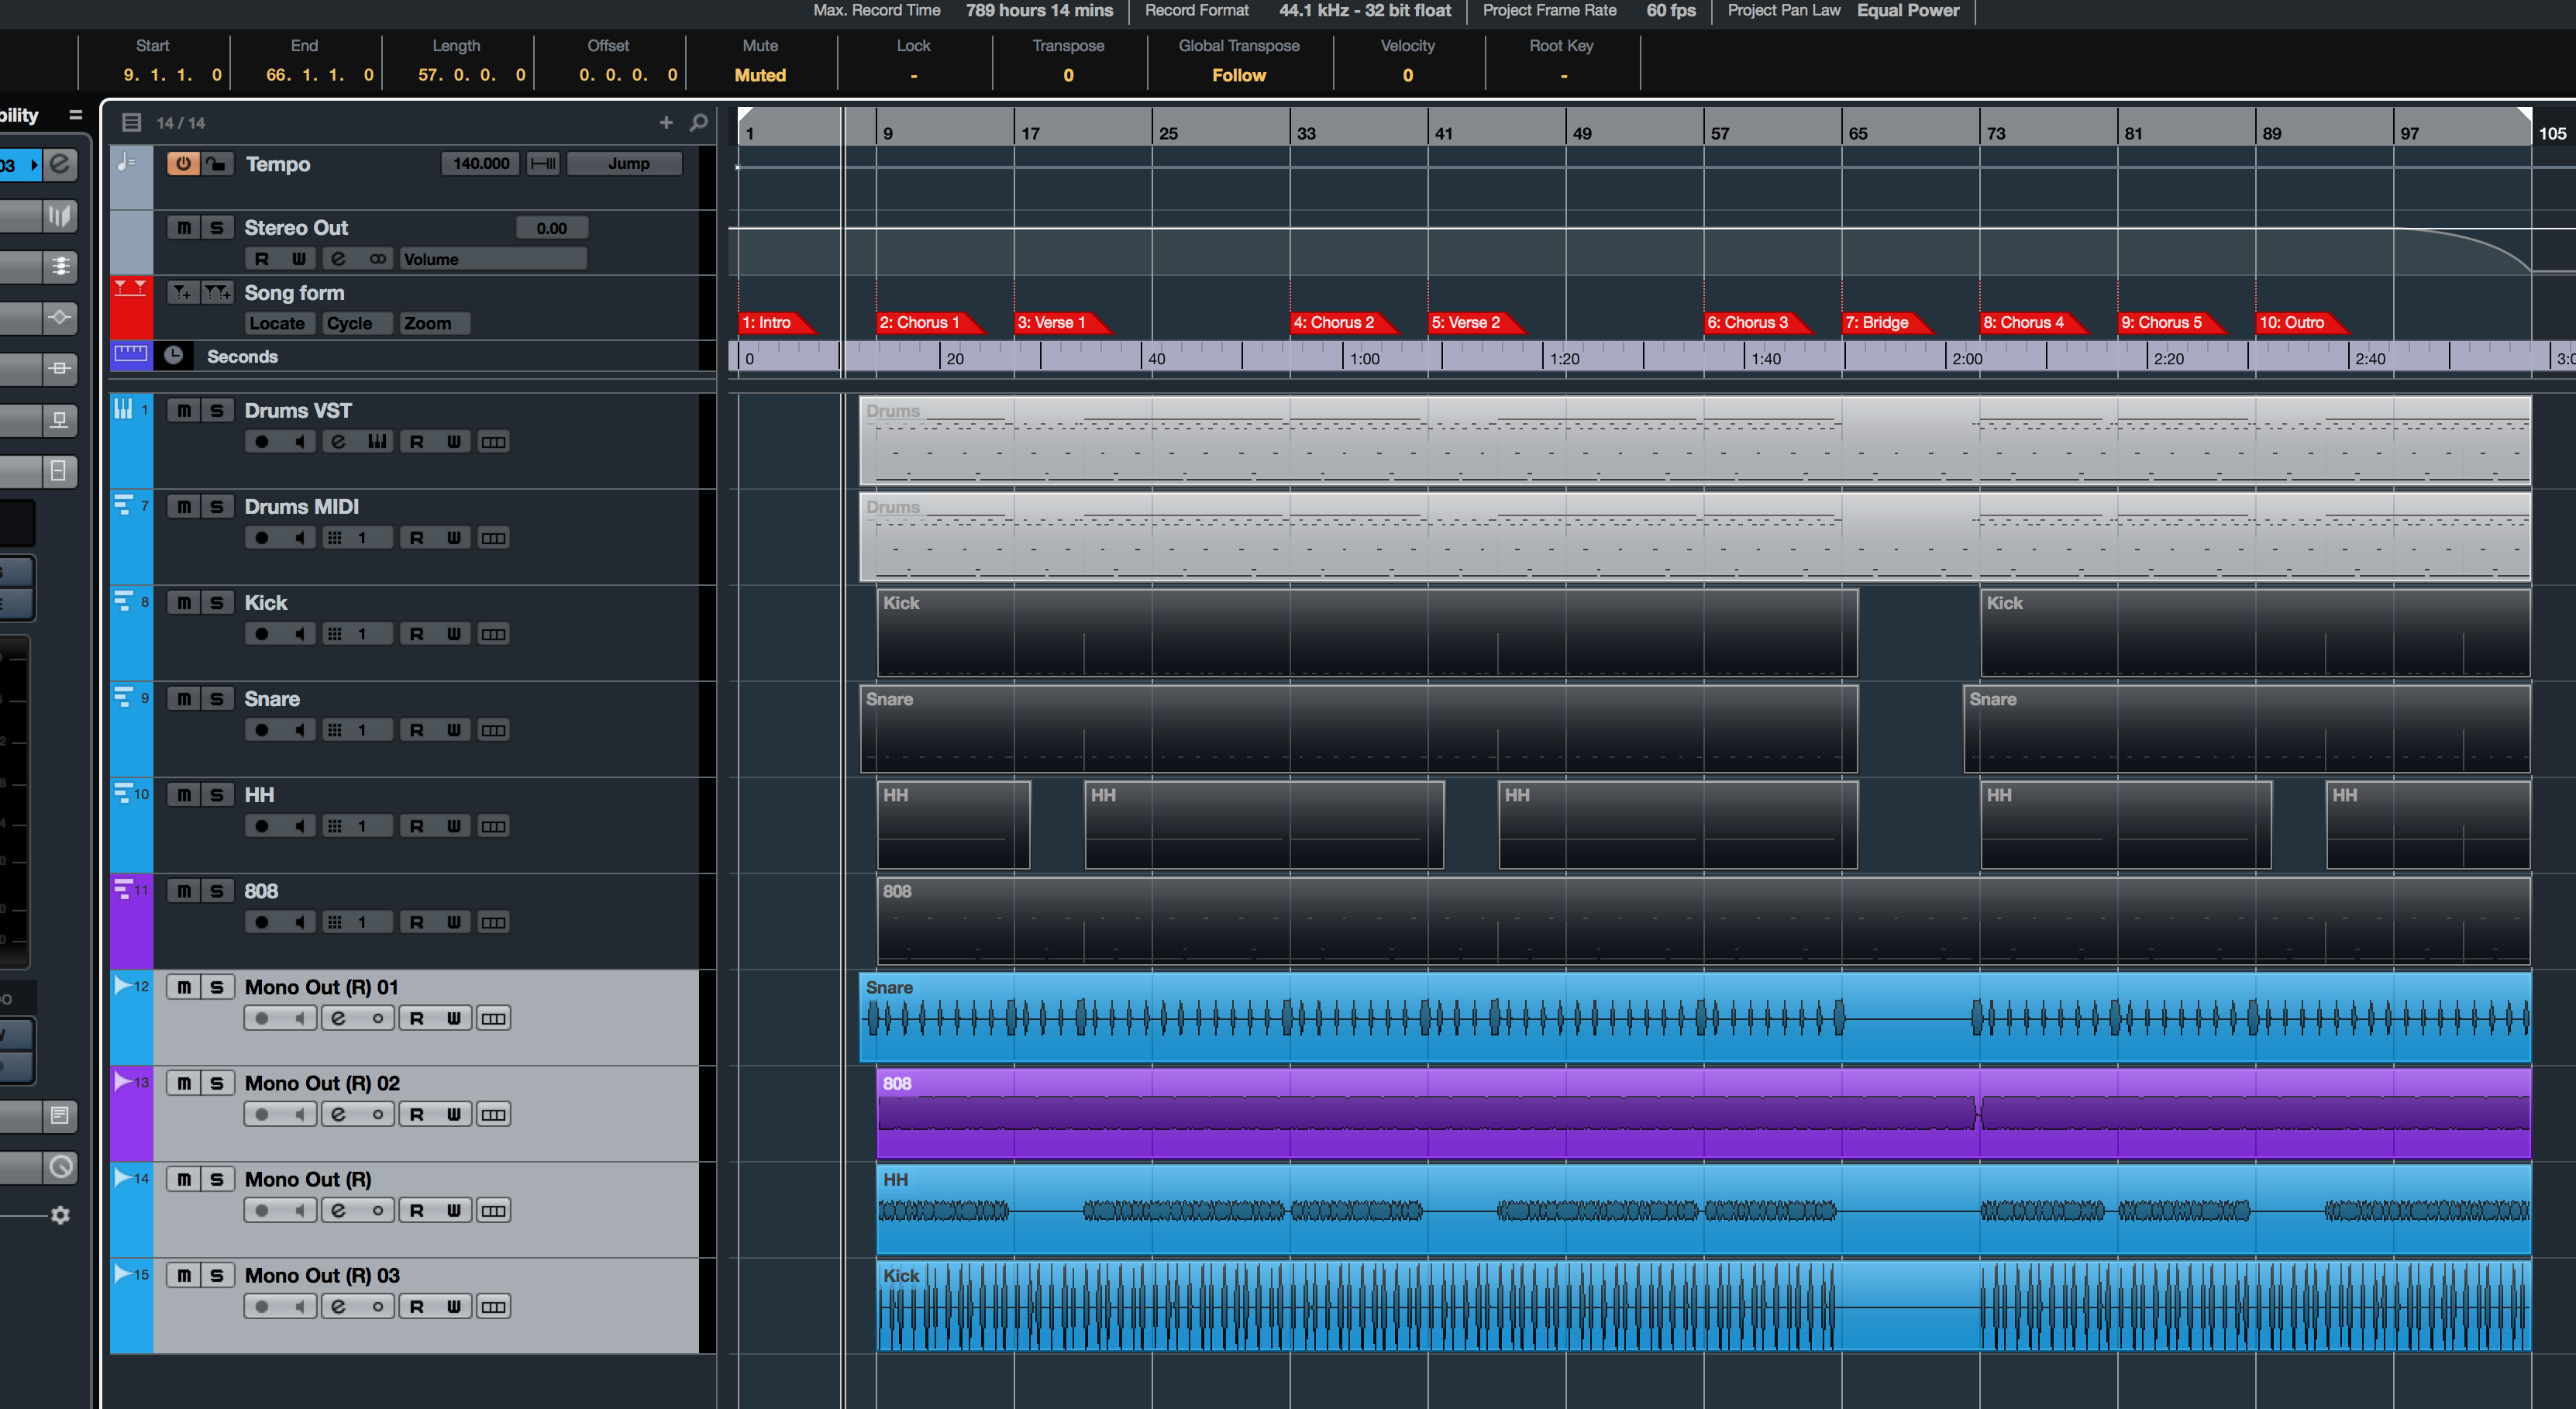
[ Mono Bus Names with ascending numbers ]
To fix this I would recommend renaming all the audio tracks since it makes it easier for mixing if the channels are labeled appropriately. All you have to do is replace the current track names with the existing audio event names.
Update audio track name to match the audio file name

[ Update audio track name ]
Please Note: If you don't care that your mono instruments get rendered to stereo audio files, you can skip steps 5 and 6 all together. However, I wouldn't recommend it.
Comments and Suggestions
Hopefully, this will encourage you to use "Render In Place" more often. I hope that Steinberg comes up with a solution to simplify this whole process since all of these steps combined are relatively labor-intensive and time-consuming. I would love to see a feature where I can use "Render In Place" with the option to save my third-party multitimbral instrument outputs as mono.
Author, Marcel Schulz

Or iPhone one-tap :
US: +16699006833,,130513269# or +16465588656,,130513269#
Or Telephone:
Dial(for higher quality, dial a number based on your current location):
US: +1 669 900 6833 or +1 646 558 8656
Meeting ID: 130 513 269
International numbers available: https://zoom.us/
Stay connected with news and updates!
Join our mailing list to receive the latest news and updates from our team.
Don't worry, your information will not be shared.

