Mixing Foundations: A Cookbook for the Modern Music Producer - Chapter 3 - Reductive EQ
This is Chapter 3 of Mixing Foundations – Learn how to identify and remove unwanted frequencies, why reductive EQ is one of the most important tools in modern and classic workflows, and how to use clean digital EQs like FabFilter Pro-Q 4 to bring clarity, punch, and depth to your mix. Explore the difference between low cuts, low shelves, and bell curves. Discover why taking out the garbage is often the most musical move you can make. (12–15 minute read)
How to use Reductive EQ like a Pro
Welcome back to the Next Level Sound: Mixing Foundations: A Mixing Cookbook for the Modern Music Producer.
As I mentioned earlier, and probably will mention a few more times over the course of this mixing cookbook, the chapter order reflects the order in which you perform the channelstrip processing workflow.
First, we saturate the sound by inflating it with harmonics and clipping. Then, we carve out the sound's profile, retaining its body while eliminating unwanted frequencies.
That’s a pretty strong statement, but that is, in fact, the idea. We want to remove the traffic of non-musical frequencies, so that each sound can speak in the mix without fighting through a swamp of muck and a haze of noise.
 [ Example Of Reductive EQ ]
During the weekly live feedback sessions at nextlevelsound.com, we discuss what we refer to as “collision distortion.” When you solo the individual elements, you don’t hear the bad grunge, but whenever everything is playing, there is an ugly ghost in the machine.
That’s collision distortion.
Twenty-four tracks without reductive EQ will not play nicely in the sandbox—unintentional frequency information collides dynamically with other unintentional frequency information, obscuring the picture the producer is trying to paint.
We want to remove any unmusical low frequencies that will clog the groove, any high frequencies that will pollute the air, and any rogue resonant frequencies that poke around and crowd the mix.
Unlike saturation, which provides immediate gratification through the instant transformation of making things sound amazing, reductive EQ requires a bit of faith. Even though reductive EQ is one of the most powerful tools we use - not only in channel stripping but also in mixing and mastering, in general, its true power lies in its cumulative benefits. Cutting 30 Hz on one track may not be dramatic when bypassing the signal. Whereas with saturation, bypassing the effect can often make a huge difference. However, bypassing 32 tracks with and without a 30 Hz low cut can be mind-blowing!
 [ Old-School EQ ]
The same can be said for a high cut on 32 tracks at 14K for example. It’s game-changing. And all very accumulative in nature. And as such you sort of apply it religiously in good faith of the result. I once worked on a very big stem mastering project over several months with a very fancy producer from India; this was music that was going to be heard by literally millions of people as a big movie soundtrack. And after tons of toiling to attain his vision, the biggest, most powerful tricks we used to get the desired result?
Saturation and Reductive EQ
Even after decades of doing this, and now working in a totally modern way, the big game changers were still saturation and reductive EQ—more than all the flashy mid-side, multiband side-chaining tools (which are obviously cool too, but sometimes it’s the simple stuff that's the most powerful).
Equalization Origins
Equalization started way back in the old recording days as a corrective mechanism. If someone was too far away from the mic, engineers could add high frequencies to bring them closer. They call that presence EQ. And if something was too close, they could darken it to move it further away
if I’m close to you, I’m “brighter” in the world of psychoacoustics; and if I move away from you, I get “darker”
An equalizer was just a volume control, but they could split the volume up into little bands for the sound (essentially, an amplifier). A proximity tool. So, rather than just turning the whole trumpet up or down, or the whole drum up or down, or the whole vocal up or down, you could turn certain parts of each up or down, and you could equalize things for problems in the recording. A tone control.
But eventually, people realized equalization wasn’t just corrective, it could be very, very creative.
Modern Clean EQs
In our world of tools at Next Level Sound, we have two sides of the EQ coin: Clean, clear digital EQ and the classic, saturated, analog-modeled EQ. It has no sound.
For the clean and clear EQ tool, we like Fabfilter Pro Q.
It digitally manipulates energy, but it imparts no saturation. Once you have the saturation you like, you use this EQ to shape it. And when we do reductive EQ, which is a huge part of our school, we typically use FabFilter Pro-Q. It’s the most flexible, and I think it sounds the best. And Fabfilter is constantly improving it.
Old-school Analog EQs
On the other side of the coin is the analog saturated stuff, the old-school analog EQs, such as the Neve, SSL, API, Helios, Harrison, and many others. The Neve is vintage; it has transistors and transformers, and it has a very saturated sound, a combination of even and odd-order harmonics. Additionally, we have the SSL, which is also from a console, so it has a particular color and saturation. A dynamic and polite British crunch. Something you’ll notice with analog EQs is that some of the choices are fixed. We can’t always do everything we want on these. They’re old, and things are often set in their ways. You could see this as a negative, but I recommend you don’t. See it as a musical thing - forcing you to make restrictedly-musical decisions. Remember that these EQs were developed over decades, and they were refined and made better and better and better. There are some incredible choices out there - both the analog-modeled plugins and the real things.
For reductive EQ, we’re gonna use FabFilter, and for additive EQ, we’re gonna use vintage stuff: UAD, Slate, whatever you have. Does it mean you can’t do some additive EQ here with clean digital EQ? Of course you can.
Does it mean you can’t do some reductive EQ in the analog realm? Of course you can. But primarily, we’re gonna use the FabFilter for reductive EQ and the vintage stuff for additive EQ.
Taking Out the Garbage
When I first started mixing with Elliot Shiner, who mixed the likes of the Eagles and Steely Dan, everything was on a Neve with 8078 modules. I was just learning, and I would sit behind him and try not to annoy him and slow him down, but I had to pick his brain about certain things. I remember looking at his console and seeing he wasn’t boosting much. Most of the EQs were cuts. I was like, what’s up with that? I asked Elliot about this, and he said, “Listen, the really good engineers take out all of the bad frequencies. And then what’s left, you can boost.” The unenlightened engineers, he said, boost over the garbage and don’t take out the bad stuff. Within each sound, there’s a part that’s really important to the integrity of that sound—and then there’s garbage. Sometimes, the garbage is in the low, sometimes in the high, and sometimes in the middle.
So, after beginning our channel strip with saturation to add density to the sound, we’ll carve it out with a clean and clear digital EQ, like Pro-Q4. But first, I want to highlight the basic shapes you can make with EQ, which will help you understand how to do both reductive EQ and additive EQ.
The Low Cut
Whenever we cut or boost, we always go from low to high, as low-frequency energy always masks higher-frequency content. So, the first step of reductive EQ is to ask yourself if you want a low cut or a low shelf - or both. A low cut is a high-pass filter; it attenuates or turns down the lows and preserves the body of whatever’s to the right of it, and you can adjust the cut wherever you want. And in addition to adjusting the cut, you can adjust the poles or how steep it is, which is how many decibels-per-octave it drops off: 6 dB/oct is gentle (1‑pole), 12 dB/oct is standard in most analogue devices (2‑pole), 18 dB/oct is fairly steep (3‑pole), and we’d rarely ever go as steep as 24 dB/oct (4‑pole).
 [ Reductive EQ - Low Cut ]
In addition to the frequency and the slope, there is the Q parameter. If you push this clockwise, you can create a resonant peak before the drop‑off of the filter. This is really good for kick drums because it adds a little subby bump before the drop‑off. Honestly, almost everything gets a low cut in our system. We don’t want subs on the vocals — they will fight, clog up, and accumulate. We don’t want subs on our high hats; we don’t want too many subs on our pads. We want to save the subs for the kick and the bass that occupy that zone. And even on kicks and basses, we use what we call rumble filters set very low — 20 Hz, 30 Hz, 40 Hz — to take out this extra, super‑low sub that’s very hard for speakers to reproduce.
 [ Reductive EQ - Rumble Cut ]
Speakers are instruments; if you play the guitar, you play the guitar. If you play bass, you play bass. But if you mix and master, you play the speakers. If your mix has too much energy below 40 Hz, there are very slow‑moving waves telling the speakers, “Hey, you can never rest!” When a kick drum kicks, it pushes the speaker out, and when the kick is done, it sucks back in. That creates the sound of the kick. If you have slow moving waves that are lurking, renegade, unwelcome, unintentional, unmusical, low‑frequency garbage, the speakers can’t punch in or out and you get that clogged and congested sound we’ve all encountered. After you set your low cut, you’re gonna go in and out of bypass to see if you like your cut.
If you don’t hear any difference, does that mean that you’re in the wrong place? No!
For example, if you’re bypassing on a vocal and you can see that you’re cutting low end but you don’t hear a big difference, there could be a couple of reasons for that. One is that it might be nonmusical — because of how low it is, it’s non‑tonal. The other possibility is that your cut might be perfect. You might have cut out all the nasty stuff, but not cut into the meat of the sound. Either way, just remember that sometimes the result of your cut won’t sound like a lot, and on one particular track, it won’t make a huge difference. But when you’re working with 16, 24, 32 tracks, it adds up. Just like console color, it’s accumulative.
 [ Next Level Sound Free Trial Banner ]
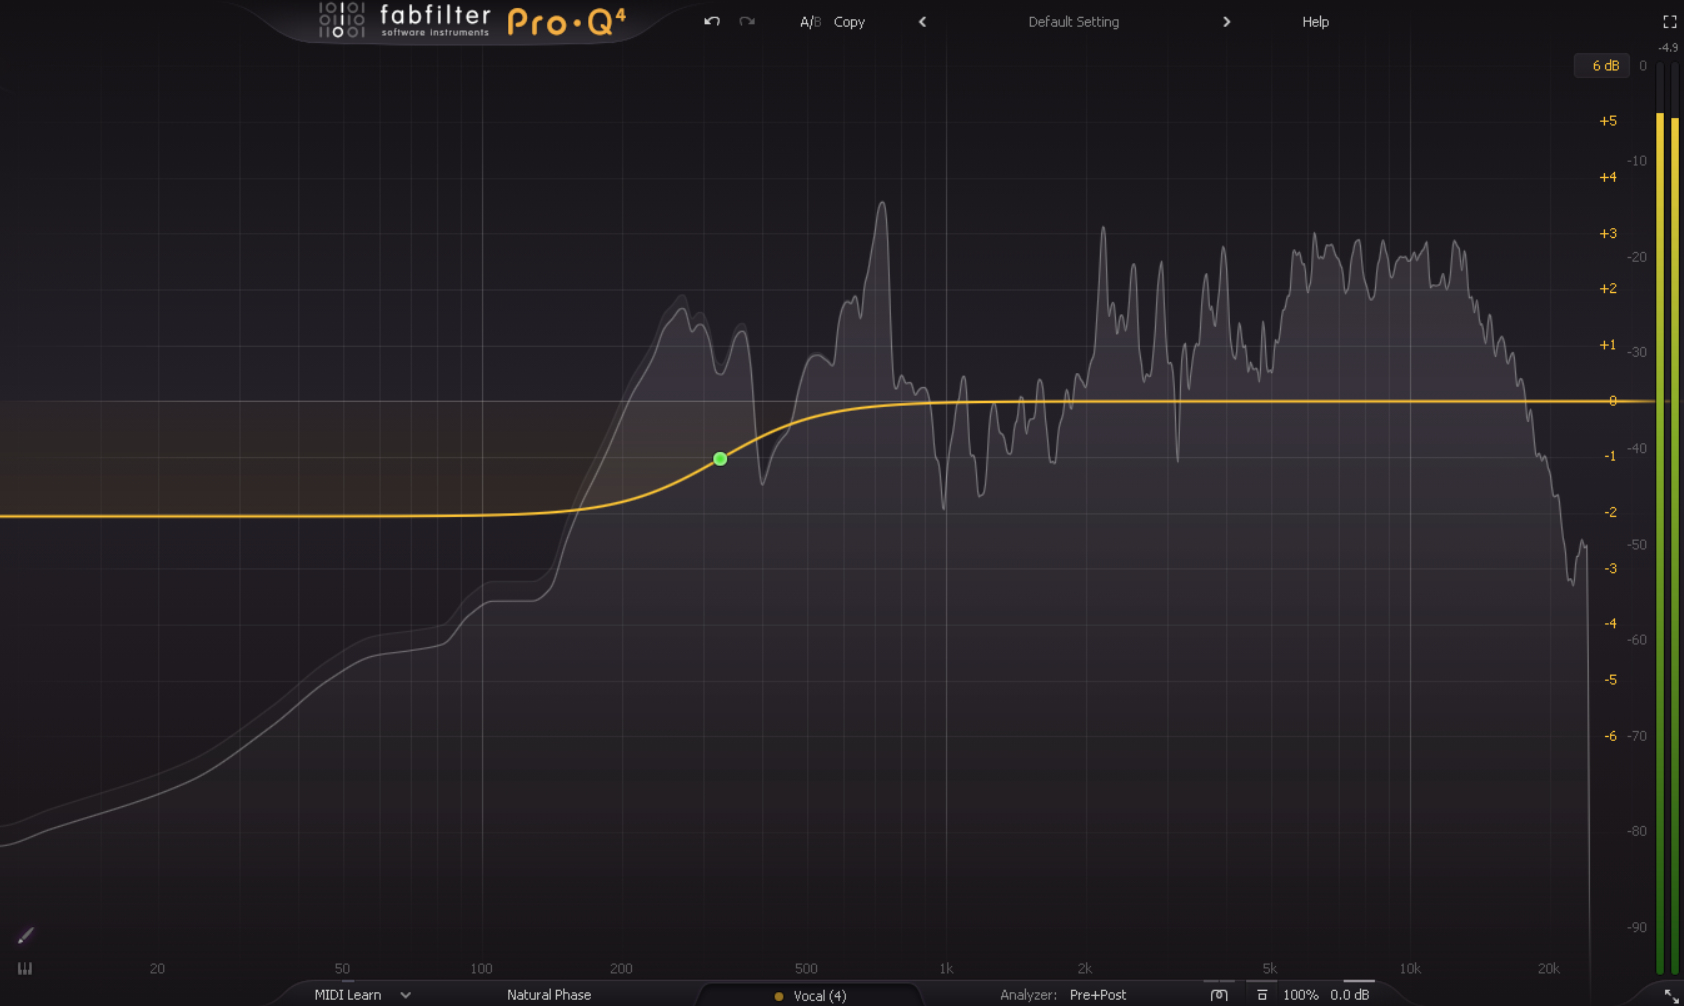
The Low Shelf
The next step is to add a point where we can adjust the low frequency with a low shelf. A low shelf has a shoulder, it dips down, and then it kind of flattens out. It looks very different than a low cut — a low cut is much more extreme, whereas a low shelf is much more gentle. Believe it or not, you’ve been playing with low shelves your whole life. When you were a kid, you were using a shelving EQ. Where were you doing this? On your home stereo. This is what they put on home stereos to keep things simple for people, because they’re gentle and they’re natural.
 [ Reductive EQ - Low Shelf ]
The guy who invented these was Peter Baxandall; he won an engineering contest. He created the Baxandall tone control circuit, the curve that’s been on every stereo all over the world for the last 60-plus years. And guess what he got for that? A watch. Isn’t that terrible? Justice for Baxandall!
 [ Reductive EQ - Low Shelf with a High Q ]
So, if we go to the Q just like on the filter, we can create a resonant shelf where there’s a little bump up before the dip, and it flattens out (again, this can be cool for kick drums). Or, we can create this nonlinear, weird-looking shelf that’s in a lot of analog gear. And we can do the gain and the frequency, but it defaults to Mr. Baxandall’s shape. This can work in conjunction with a low cut to fine-tune and have them work together. We do this because after doing a low cut, an additional low shelf can reduce the low end with a gentler shape.
 [ Reductive EQ - Low Shelf with a Low Q ]
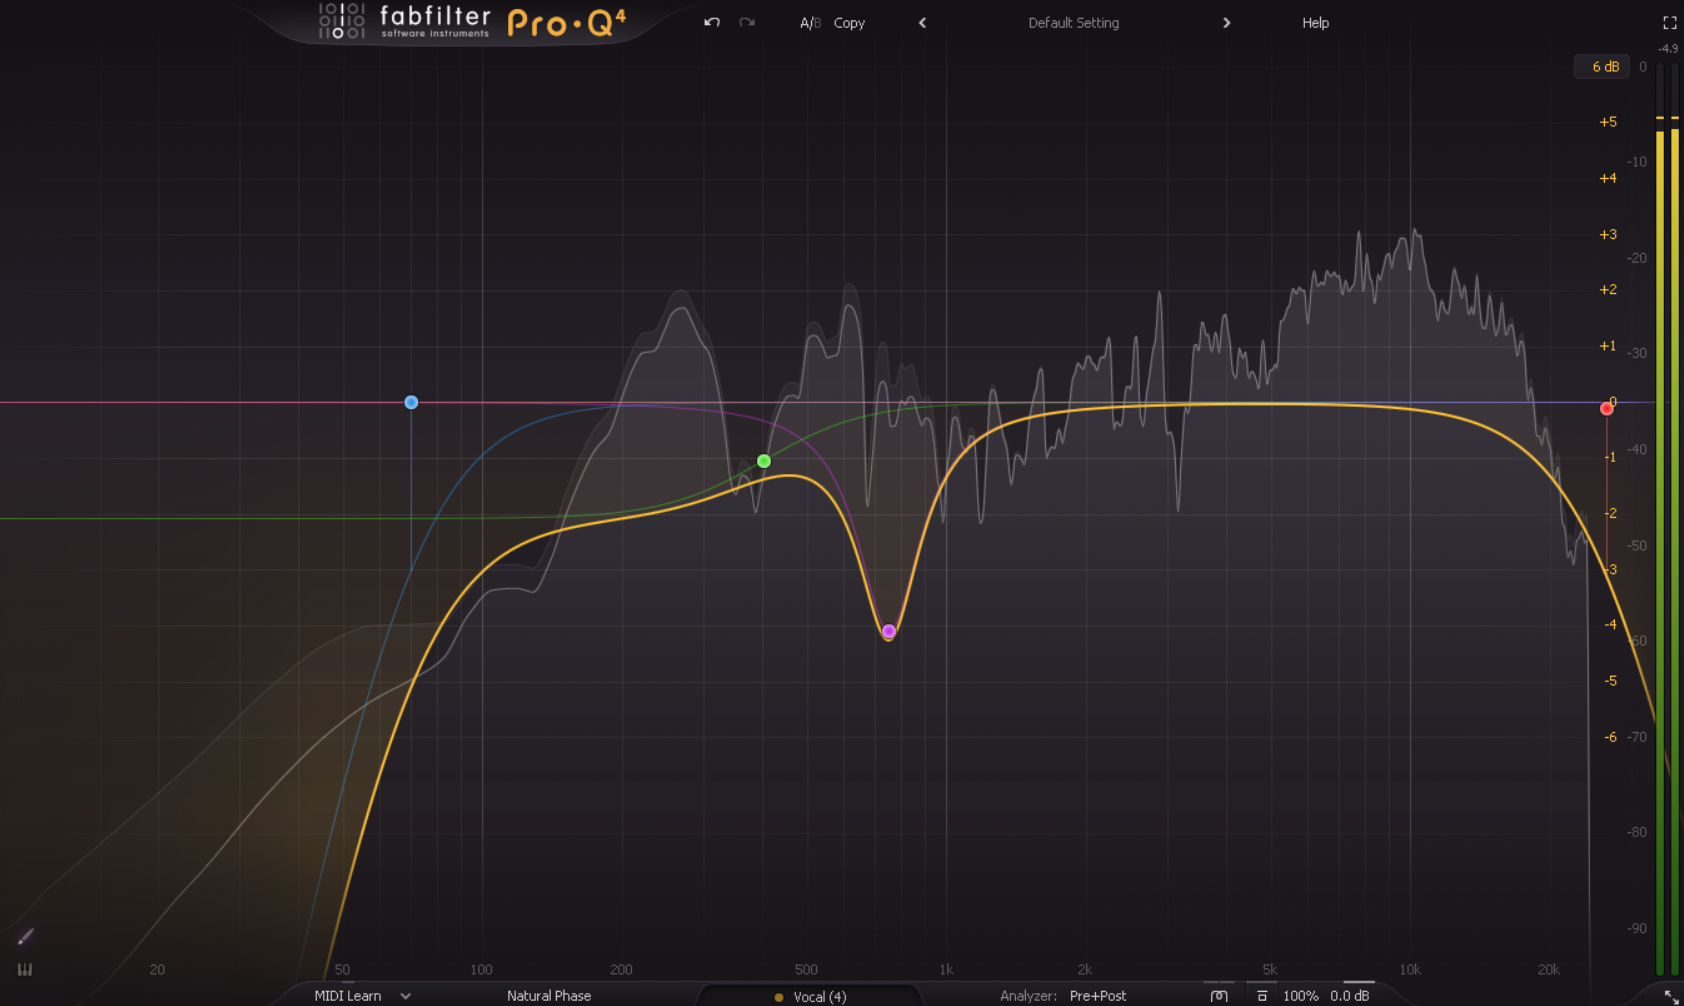
The Bell
You also might find garbage in the middle of the sound. This is when you would want a bell shape. A bell shape takes out things equidistant to either side, and you adjust the width with a Q parameter. You can go wide or narrow. When you’re recording vocals in real acoustic rooms, those rooms are like drums—they resonate. This shape helps you take out those resonances. Sometimes, a little cut is all you need, and you can adjust the width, the frequency, and the gain.
 [ Reductive EQ - Bell Cut removing Resonances on a Vocal ]
This takes out unmusical parts in the middle of the sound, things like one string on the guitar being too loud or one bass note being too loud. We can do that with the bell.
 [ Reductive EQ - Bell Cut with high Q ]
The High Cut
And then as we go to high-frequency reductive EQ, it’s the same thing all over again. Like there are garbage lows that hurt our mix, there are garbage highs that hurt our mix: hiss from an amp, overly bright drums, and sometimes even saturation that’s just gotten a little out of hand on the high end. We can trim it back and make the sound tighter, smoother, and easier on the ears. And if we trim lows to make room for the kick and the bass, what are we trimming the highs for? Space. And what’s the other word for space? Reverb. If there’s too much unmusical garbage, it clogs the mix and messes up the reverbs.

[ Reductive EQ - High Cut ]
If you need to take something off the top, you’re going to end up freeing up all this real estate that can be used for another instrument that needs to live there, or it can simply create that “clean air” reverb we all crave. The bell can be reductive, but it can function as a boost later on, too.
 [ NLS Windtryst Mixing and Mastering Retreats Banner ]
Practical EQing Tips
1. EQ Setup and Technique
If you’re using Pro-Q (or a comparable EQ) when listening for resonances, there’s this cool feature where you can solo the band as you go: Click on the little headphone icon.
Two-finger scroll or command scroll will allow you to narrow or widen the band and scroll around to listen for something really ugly.
You can gently pull it down and cut it when you find it.
Then you can adjust the Q and the gain and bypass on and off to hear what you’ve done.
Any time we have EQ, we also have crossovers. We have the original signal and the boosted signal, and there’s a transition between them.
2. Use Natural Phase
If you’re using Pro-Q4, use Natural Phase. Don’t use Zero Latency, don’t use Linear Phase, use the middle setting as your default, as it has a lower amount of phase distortion compared to Zero Latency, and does not have the pre-ringing artefacts of Linear Phase.
About 99 per cent of the time, you’ll be using Natural Phase.
Linear Phase is used when you have a recording with two elements with a phase relationship that must be maintained.
Let’s say you’re recording a real snare with microphones, and you have a top and bottom snare—this would be a phase relationship.
If you want to EQ them, you’d need to use a linear phase on both to maintain their phase relationship.
This doesn’t happen all that often in electronic music, but sometimes it does in organic music.
Linear Phase is also recommended for parallel channels where phase relationships must be maintained.
Once you get the hang of this, people who don’t know this system will be standing behind you amazed and full of questions, just like I was watching Elliot Shiner.
3. Reductive EQ Philosophy and Workflow
Reductive EQ is an incredible game changer. Take out the garbage - don’t boost over it.
Work in Solo or with all elements playing when using Channelstrip Processing?
This is a complex question that often arises.
Do I do reductive EQ in solo, or with everything playing? The short answer is that it is easier to do reductive EQ in solo, but to do additive EQ with everything playing.
When applying reductive EQ, sometimes the sweetspot or “right answer” is not some dramatic choice, but a move that preserves the important body of the sound while removing the garbage.
And the dramatic before-and-after experience is cumulative when applied judiciously across multiple tracks.
So, yes, this requires a little experience to avoid cutting too much and creating a thin, filtered sound.
And yes, it takes some faith and confidence that your non-extremist cuts will result in a full and uncrowded sound that is full-bodied.
4. Transition to Compression
Now that we have inflated and carved out the sound, it’s time for compression - probably the most intimidating and confusing, yet essential, task in all of channel strip processing.
Don’t worry, we have been successfully teaching producers how to compress for decades now! And it’s fun once you get the hang of it.
Written by Daniel Wyatt
Developmental Editor: Trevor Courneen
Senior Editor: Paul Fawkes
Stay connected with news and updates!
Join our mailing list to receive the latest news and updates from our team.
Don't worry, your information will not be shared.