Mixing and Mastering Tips – Keeping low end with Pro-C
Uncategorized
May 23, 2018
Danny Wyatt here. I’ve received a ton of emails, questions, and requests for mixing and mastering tips. Today I’m going to focus on commercial loudness.
Before I do, I want to mention that everything I’m showing you will work in any DAW. I have some favorite tools (like FabFilter, Izotope, and Universal Audio), but you can do this stuff using the stock plugins in Ableton, Logic, or whichever software you’re using.
I’m excited to show you these new techniques that I’ve developed over the past year. I find that my tracks sound best when I blend the latest high-tech surgical plugins with emulations of classic gear that’s been around forever. This gives me the best of both worlds: organic warmth and character shaped by precise digital tools.
Here are two of the questions I received:
1) “How do I achieve commercial loudness and maintain punchiness as achieved by artists like Knife Party, Skrillex, even Deadmau5. Any tips on this topic besides the usual high pass everything, choose good samples, get it right in the mix – I want to see and hear it done from start to finish.”
2) “I find my mix is balanced and punchy, and then when it comes to mastering I’m forced to distortedly squish it into garbage. I’m guessing I need to learn how to sacrifice certain elements to get it that loud?”
I’ve put together a quick video for you that will help (thanks to Matt Winter for the awesome track):
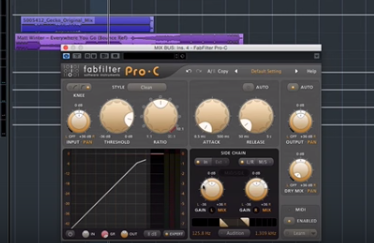
I feel that there’s a big difference between loudness and power. Lots of people make things loud, but not powerful, and that doesn’t sound good to my ear. The low end of your track is loud, and that’s usually what triggers the compressor. This effectively means that the low end is getting turned down by the compressor, which reduces the power.
What I talk about in the video is using a stereo compressor on my mastering chain to INCREASE the power of the track. I do this by filtering the input signal to focus on the midrange (most compressor have a way to do this, or you can create and filter your own sidechain input using a copy of your source audio). Now the compressor is being triggered by the midrange, allowing the bass frequencies to pass through unchanged. This brings a ton of low end back into my mix that would otherwise get squashed by the compressor. The result is a more powerful sound that jumps out of the speakers.
You can also use this trick on individual tracks. It’s great on vocals where you want to compress but still preserve the low end.