Cubase 10 Best New Features Explained - Part 1

Cubase 10 Best New Features Explained - Part 1
In case you haven't noticed, Steinberg's Cubase 10 is out. You can download the free 30-day trial version to try the new features. The Cubase 10 Download link can be found on the Steinberg website. The download link for Cubase 10 Pro is at the bottom of the page.
Like every year the new version of Cubase offers a bunch of new tools and improvements. Since there is a lot of new stuff to talk about I broke up the top 10 items into 2 blog posts. In this post, I will show the first 5 of the best new features that improved my workflow greatly. Part 2 will cover an additional 5 features in an upcoming blog post.
1. Simplified Side-Chaining
The most common use of Side-Chaining is called "Ducking". It is commonly used by radio stations. As soon as the moderator speaks the music turns itself down automatically and after the moderator is done speaking the volume rises again. This is achieved by putting a compressor on the music with a side-chain input that is fed by the moderator's voice. Ducking automates the process of having to adjust the volume of the music to allow the moderator's voice to be more intelligible. The same principle is used in EDM. Every time the kick drum plays, the bass gets turned down ("ducked") by the compressor to make room for the kick.
In order to use side-chaining in Cubase, you need a compressor which uses VST3 plugin format. Before Cubase 10 you had to enable the Side-Chain input so that the routing destination became available. After that, you had to send the kick drum signal to the side-chain input on the compressor of the bass track. In Cubase 10 everything can be done directly from the plugin window itself without the need of having to open multiple additional windows.
Here is how to do it:
- Open the compressor plugin window and enable the Side-Chain input
 [ Set up side-chain ]
 - Click on "Set up Side-Chain Inputs" in the top row of the plugin (looks like an arrow pointing down)
- Click on "Add Side-Chain Input" and select the Kick
 [ Select the Kick as a Side-Chain input ]
 - Make sure the Send-Level is set to 0.00. You can adjust this later if needed.
 [ Make sure the Send-Level is correct ]
2. Plugin drag & drop from the Media Rack in the Right Zone
The Media Tab in the Right Zone now shows your installed VST Instruments & Effects. If you can't see the right zone, click on the highlighted button in the top right corner or use the key command: Cmd + Opt + R (Mac) / Ctrl + Opt + R (Win).
 [ Make sure the Right Zone is enabled and select the Media tab ]
Click on the VST Instruments icon to see a list of all your installed instruments. Make sure that the "Show VST Instrument Pictures" button is enabled to see a picture of your virtual instrument.

[ VST Instruments in the Media Rack ]
By default, the pictures only show up for Steinberg's native VSTs, but Cubase 10 now allows to take a snapshot of any plugin directly from the camera icon which was added to the top row inside the open plugin window.
 [ Add VST Plugin Picture to the Media Rack ]
After clicking on the camera icon (Add VST Plug-in Picture to Media Rack) a screenshot of the plugin gets automatically added to either the VST Instruments or VST Effects list in the Right Zone. Next time you can see the plugin screenshot in the Media Rack. Some people find it easier to remember the look of a plugin than the actual name. So this can be very helpful and will reduce the time spent on looking for plugins. You can do this for just your favorites or all your plugins, you decide! If you add too many it can slow down your initial load time depending on your equipment.
The new workflow improvement now allows to drag & drop your VSTs from the media rack to the track list.
 [ VST Instrument - Drag & drop ]
VST Effects can now be either dragged & dropped to an audio- or instrument channel itself to make it an insert effect or dragged & dropped below in an empty space in the track list to add it as an FX channel.
- Drag and drop the effect to an existing track in your tracklist
 [ Drag & drop as an insert effect ]
 - The effect now shows up on the first insert of that track
 [ The plugin shows up on the first insert effect ]
 - Drag the plugin below an existing track - this will create a new FX channel
 [ Drag & drop to create FX channel ]
 - New FX channel has been added below the existing track
 [ The plugin shows up as an FX channel ]
3. Audio Alignment
Another great new feature is called "Audio Alignment". It allows you to match the timing of similar audio events which occur simultaneously. For music production, this is especially useful for vocal recordings. Doubles and harmonies can be easily be matched to the lead vocal take without the need of editing each take manually. Without using this new feature this task can be very labor intensive and time-consuming. In modern productions it is not uncommon to edit every little word by time shifting, stretching and warping to make everything perfect. The Audio Alignment tool does these 3 things automatically. Additionally, it can solve phasing problems that occur when recording one instrument with multiple mics. Furthermore, it can be used in film post-production to replace an existing recording with perfect lip-syncing as well as for audio post-production.
 [ Vocal recording before Audio Alignment ]
In the picture above you can see an example of a vocal recording. It consists of a lead vocal with 2 doubles. Without even listening to it you can see that the 3 takes don't align perfectly which can be a problem because loose timing doubles might sound a little unprofessional.
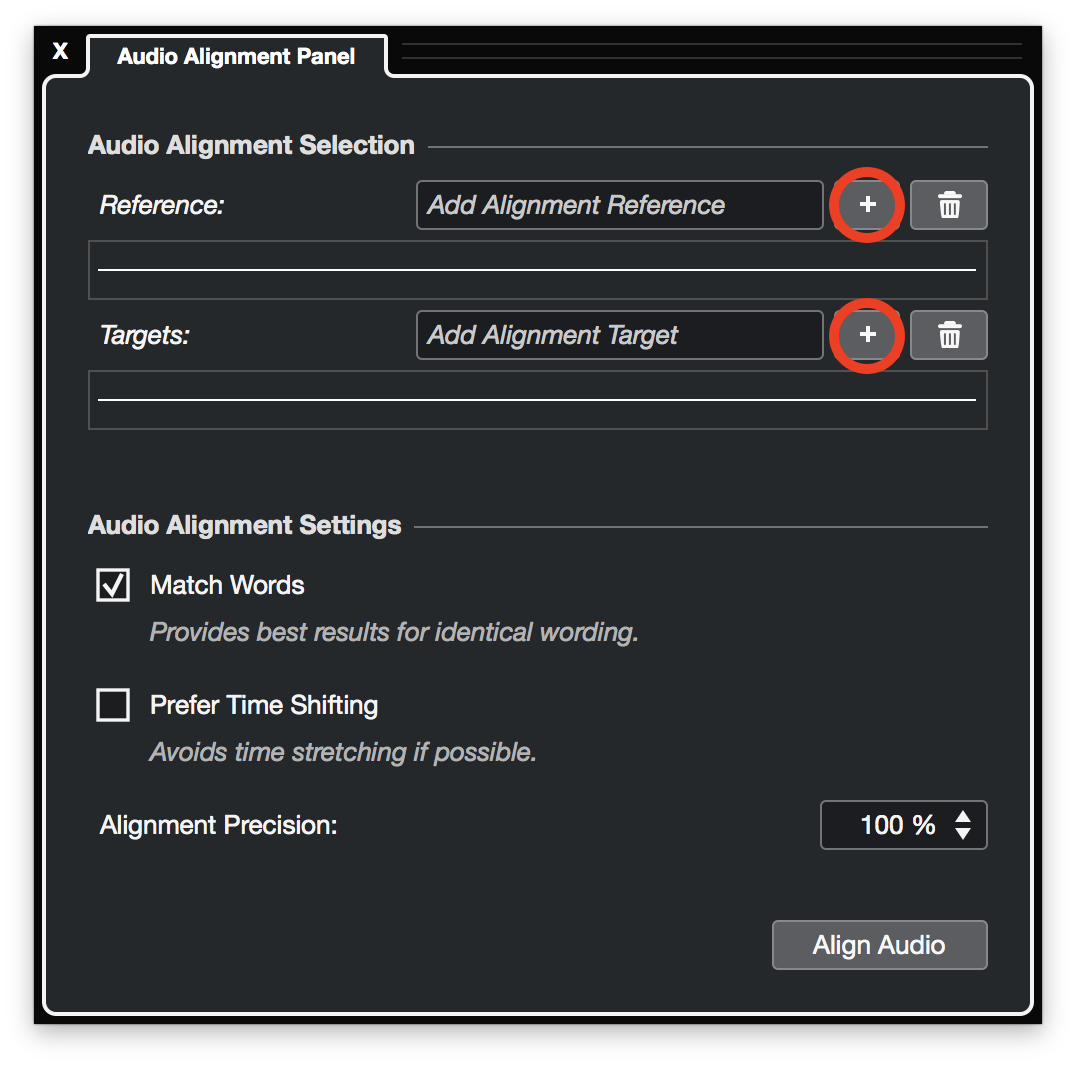
With the new Audio Alignment tool, it is no problem to match the timing of the doubles to the lead vocal. The panel can be found to the right top corner of the toolbar as shown in the image below and a simple click on the button opens it.
 [ Open Audio Alignment Panel ]
All that is left to do is to highlight the lead vocal in the project window and click on the "+" button in the Reference row. Next, select the first Double in the project window and repeat the same step in the Targets row. All that is left to do is to click on "Align Audio" button and the first Double will be aligned perfectly.
 [ Audio Alignment Panel ]
  [ Audio Alignment Panel after selecting the tracks ]
Repeat the same for the second double. As you can see in the picture below the vocals are now perfectly aligned.
 [ Audio Alignment result ]
4. "Visual Warping" - Audio Warping for Multiple Events
In Cubase 10 it is now possible to select 2 events (each on a different track) in the project window and open the Sample Editor by either double-clicking (on one of the events) or pressing Enter. New in Cubase 10 is that you can see both events displayed in the Sample Editor at the same time. A dropdown menu allows choosing which track you want to work on while seeing the other waveform in the background.
 [ Click here to select which event is currently edited ]
  [ Possible options ]
This is especially useful to rhythmically match the kick drum with the bass or to make sure that multiple different events align perfectly in time. It can also be used to layer samples. As an example, I will demonstrate how to layer 2 kick drums. The biggest problem with layering is that it might cause phase issues. This is caused by a peak occurring on one track while a trough is occurring on the other. As a result, the sound gets thinner, although the goal was to get a bigger sound.
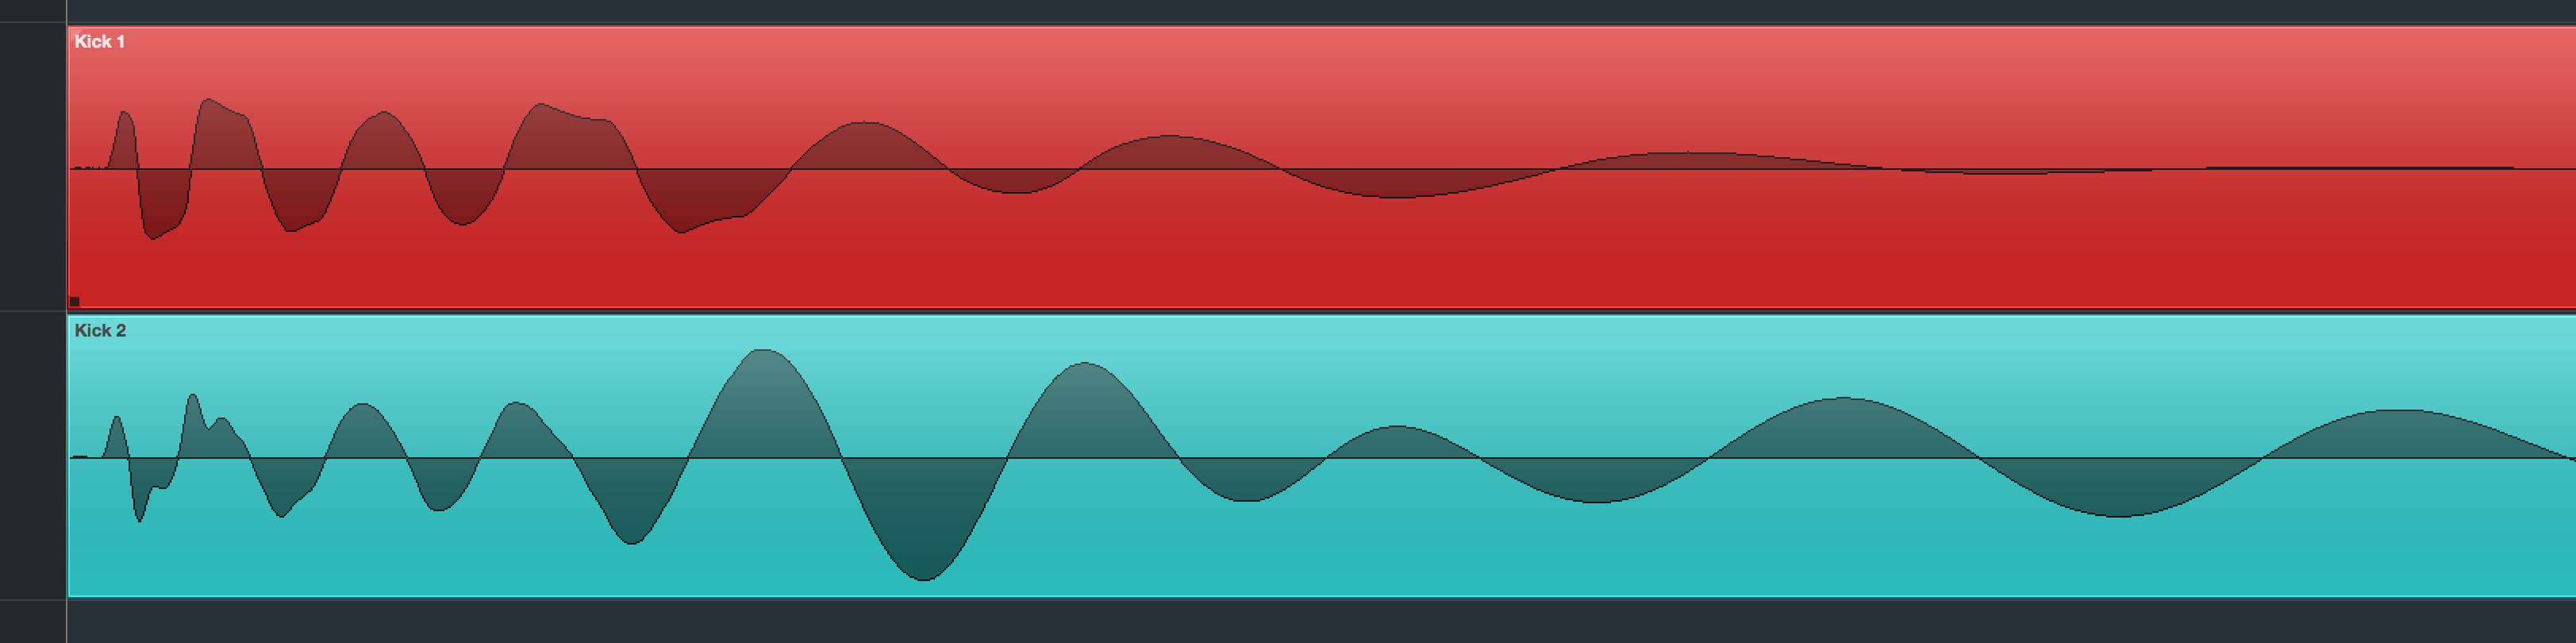 [ View of the project window before warping ]
 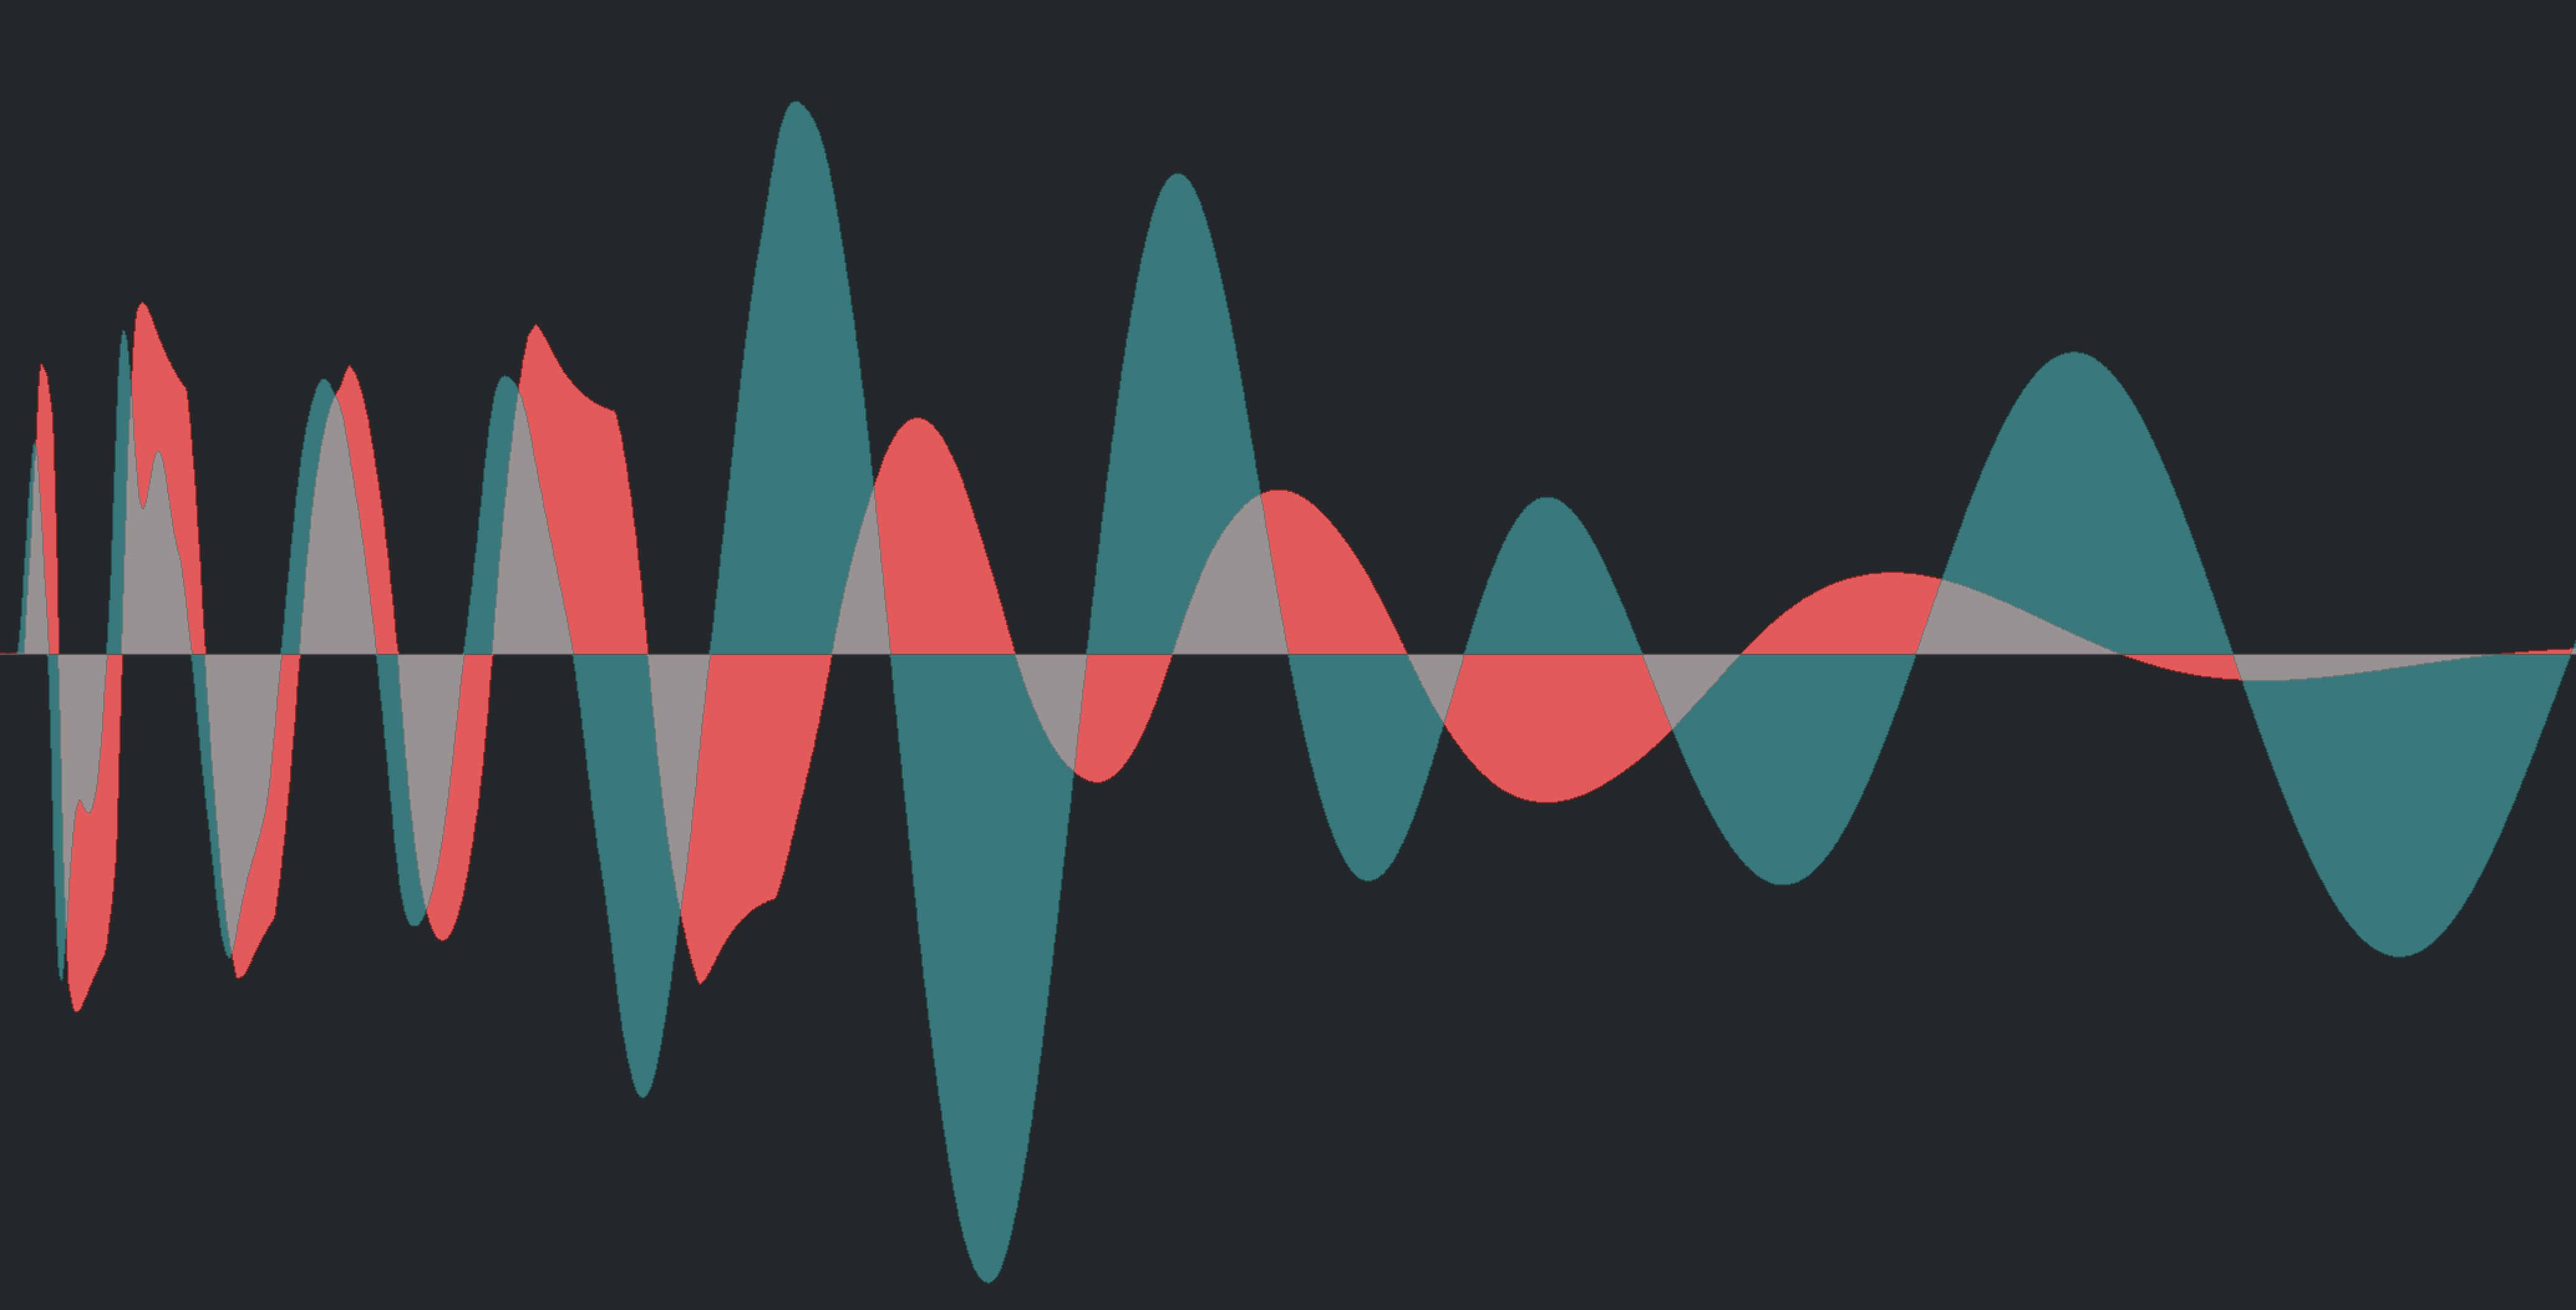 [ View of the Sample Editor before warping ]
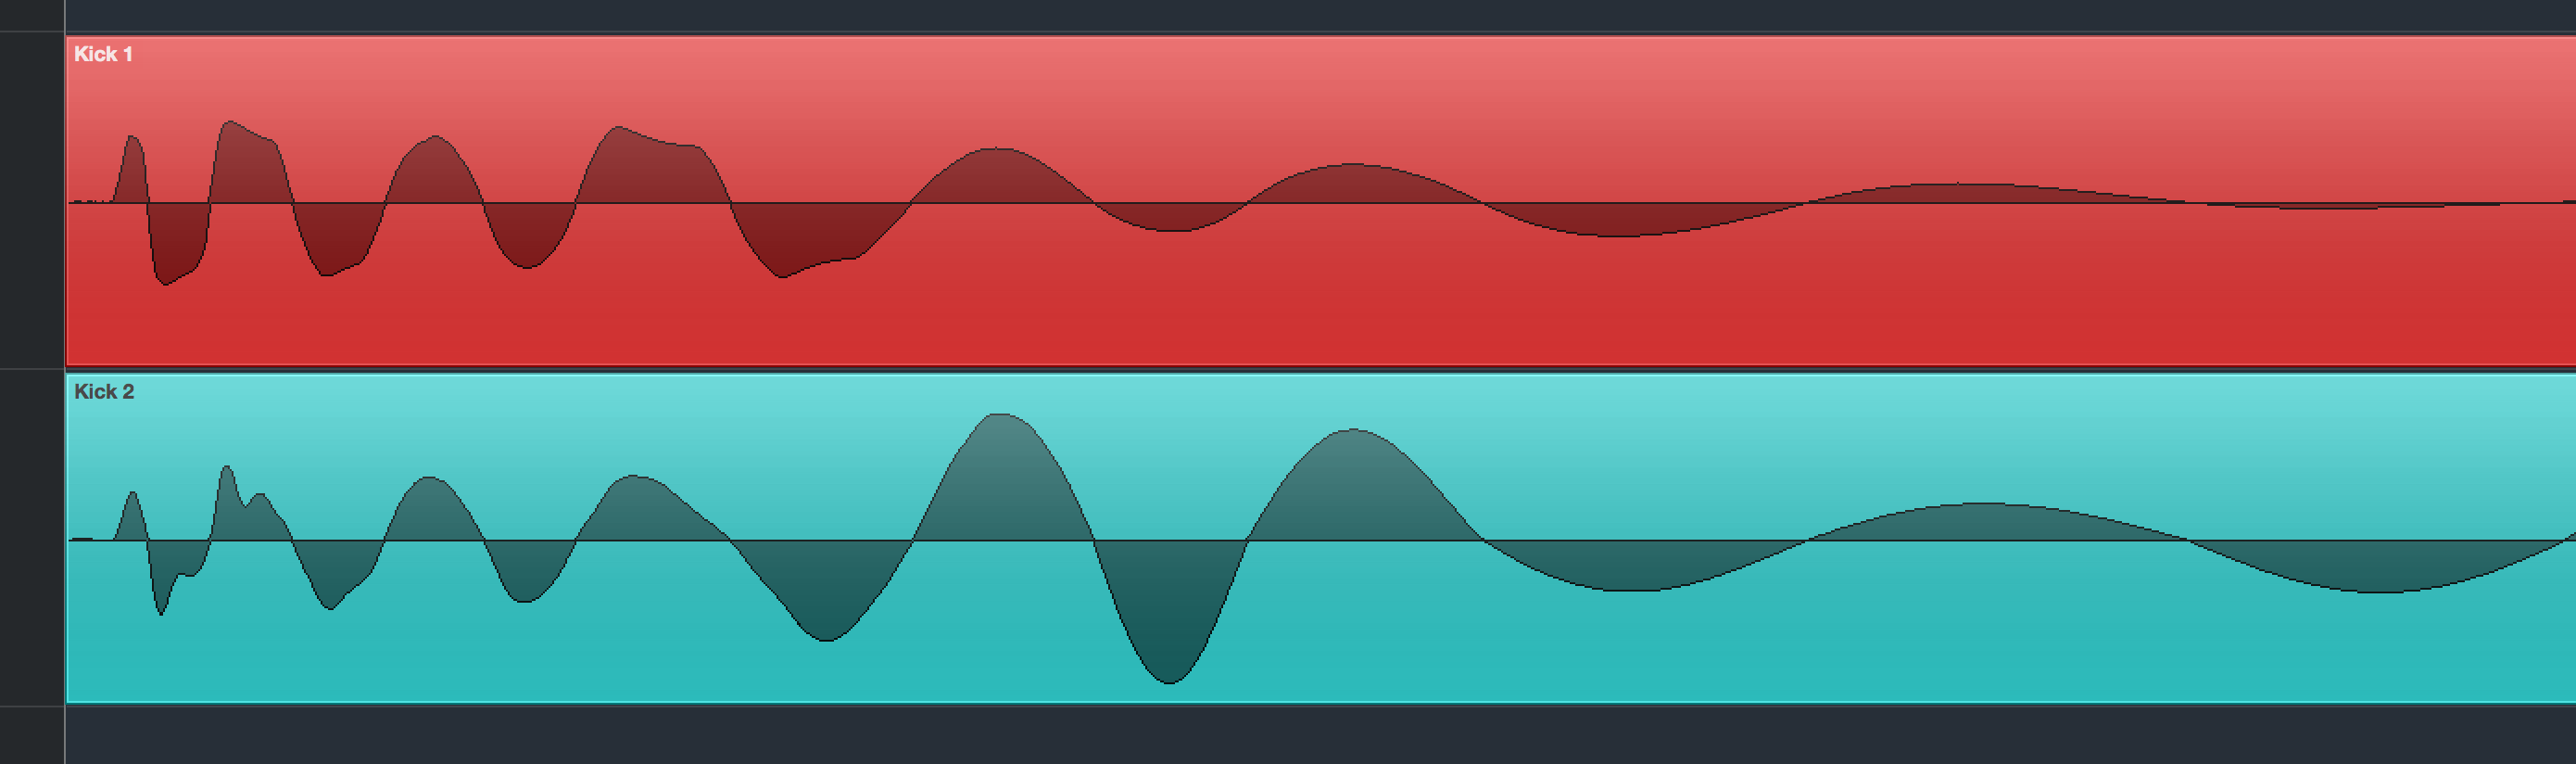
As you can see especially in picture 4.4 the waveforms don't align causing all kinds of weird phase issues ultimately making the sound thinner instead of bigger. The solution to this problem is to use Free Warp in the AudioWarp tab in the Sample Editor and align 1 track to the other. I would recommend clicking close to the zero crossing (this is when the waveform reaches the zero point) to create a new warp marker. After that, you can drag the marker around to make sure peaks and troughs align perfectly. If you create a warp marker by accident you can delete it by holding down the option key to change the mouse tool into an eraser.
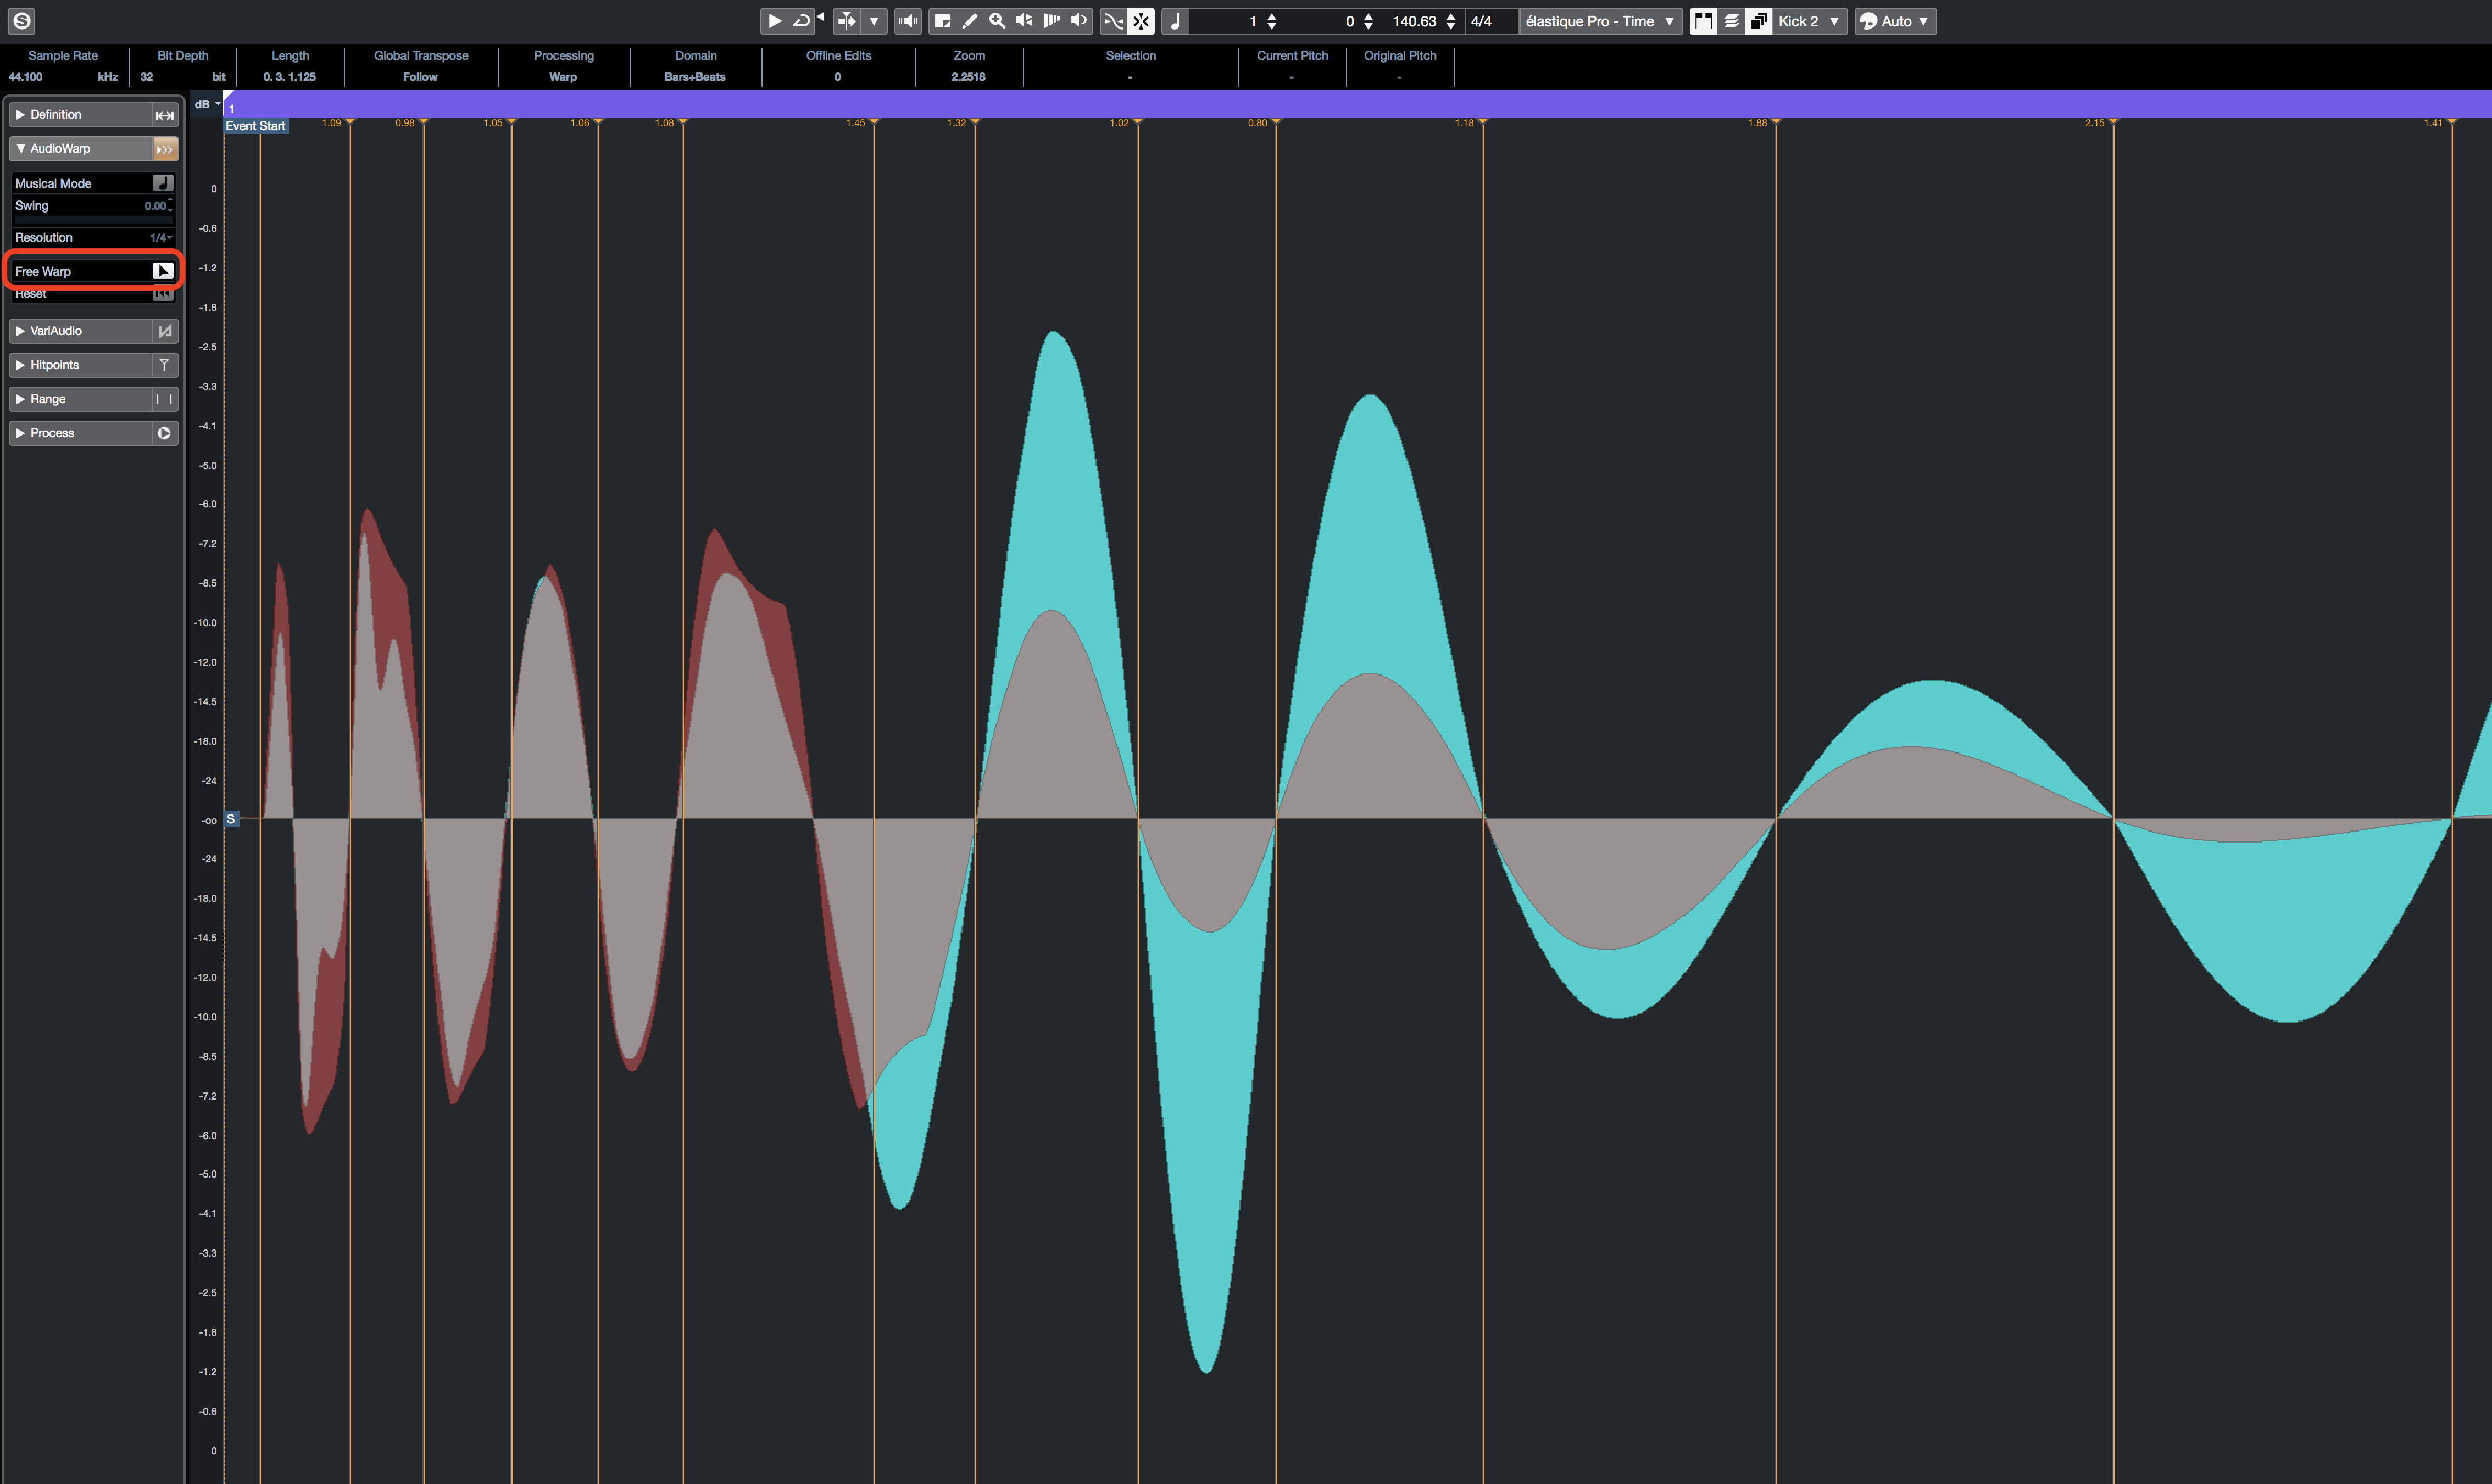 [ View of the Sample Editor after warping using Free warp ]
As a result of matching the waveforms, the kick now has massive low end and sounds full exactly as intended in the first place. In the project window, the perfect alignment result is now visible too.
 [ View of the project window after warping ]
5. Converting Files Quickly
Converting audio files was always a little labor intensive and required way too many clicks. It could be done from the Pool (Cmd + P for Mac and Ctrl + P for Windows) which most people aren't really familiar with and maybe even a little scared of. The biggest problem has always been rendering a 3rd-party multitimbral instrument to mono audio files.
In a previous blog How to Render Multitimbral Instruments in Cubase I've shown the steps needed to do this but, needless to say, it was way too much effort for something which needs to be done multiple times every day. The good news is that a couple of these steps aren't necessary anymore because Steinberg added a new function in the menu called Convert Tracks. Instead of creating a mono bus and routing everything to it, I would now recommend to render everything in stereo and then simply convert the tracks to mono afterward using this new feature.
When you are done rendering the tracks, select them all and click on Project - Convert Tracks - Multi-Channel to Mono.
 [ Menu - Project - Convert Tracks - Multi-Channel to Mono ]
The Split Multi-Channel to Mono window opens and offers a bunch of options that should be pretty much self-explanatory.
 [ Split Multi-Channel to Mono ]
After clicking on "OK" each stereo track is split into two mono channels and added below the now muted source track.
 [ Result of splitting ]
I recommend disabling the original source tracks and hiding them using the visibility tab.
 [ Disabling a track ]
 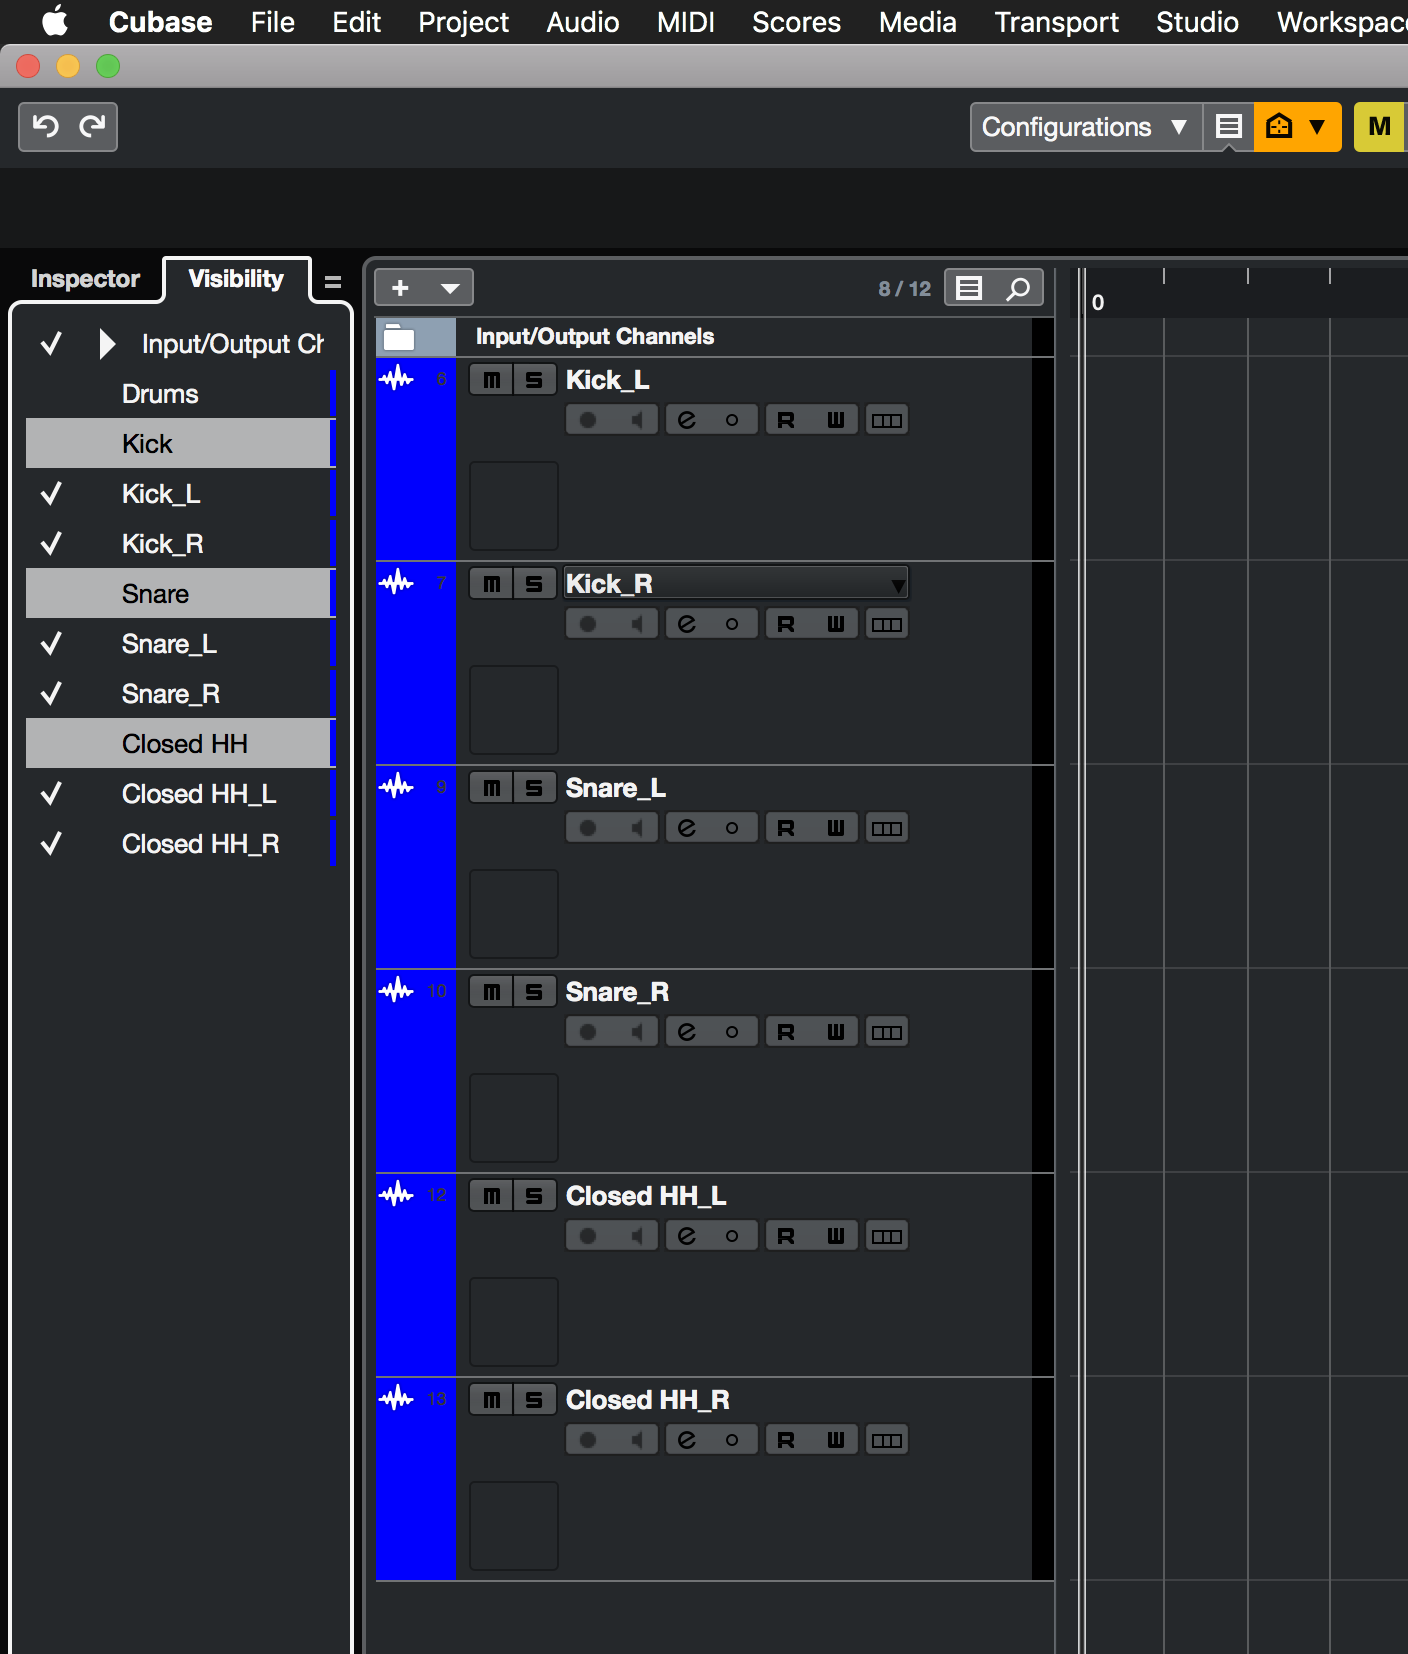 [ Hiding tracks ]
Next, delete one side of the newly split stereo files, either left or right and rename the tracks. This will serve as your new mono track.
Last but not least make sure you route the new mono tracks to your "Stereo Out" in the mixer and you're done. If you don't do this step it will route to either the left or right speaker only and I am sure you want to hear your mono tracks on both speakers.
Comments and Suggestions
Hopefully, I was able to give you a couple of ideas on how you can make use of Cubase 10's new features to get the most out of your production.
Go start using the new features right away and I look forward to sharing my next blog post with you where you will learn about 5 additional new features.
Sign up for our Cubase mailing list below and you will be notified on new Cubase Tips & Tricks.

Stay connected with news and updates!
Join our mailing list to receive the latest news and updates from our team.
Don't worry, your information will not be shared.

